Showing posts with label appetizer. Show all posts

Saturday, December 31, 2011

New Year's Eve Special: Easy Bean Salsa

You awake bleary-eyed as the fog of your dream world quickly clears and the morning light snaps your consciousness to the present-

It’s New Year’s Eve tonight and you have nothing prepared.


Fear not, my holiday-weary friend; I’ve got the salsa covered. If you’re like me, you hate to give that frazzled appearance with your food choices by serving up jarred salsa and dips. You want to look like you’ve been planning this spread for weeks, cooking for days, and tablescaping for hours. So I provide for you a short-cut.


Today’s recipe consists mostly of pantry staples with a few fresh veggies thrown in to add that “homemade” flair. In 10 minutes flat you can have this baby in your fridge and the flavors melding while you put the finishing touches on dessert or scrub off all the globs of old toothpaste stuck to the bathroom counter (that’s where you’ll find me).


Note: If you are expecting a big crowd, this recipe can easily be doubled or tripled depending on your need.


Mai’s Easy “Peasy” Bean Salsa (I love the pun here.)


1 cup of canned black-eyed peas*


1 cup of canned black beans*


1 cup of canned white sweet corn*


1, 10oz. can Mexican-style Rotel tomatoes, drained


½ c. green pepper, finely chopped


1 green onion, both white and green parts, finely chopped


1 garlic clove, finely chopped


Salt and pepper to taste


Tortilla chips, for serving


Mix everything (except chips, of course) in serving bowl. Cover with plastic wrap and chill for several hours to allow all the flavors to dance and mingle. Serve with tortilla chips.


*You will have leftover beans and corn, but don't even dream of throwing them out! Tune in Monday for a delicious vegetarian chili that will make great use of those extras.


Happy New Year, friends!

Wednesday, October 20, 2010

How Donald Miller Inspired Mai's Brown Sugar Walnuts

About a month ago, I read a completely life-changing book called “A Million Miles in a Thousand Years” by Donald Miller. The Cliff’s Notes version would go something like this:

Don is a relatively famous author who is approached one day by a couple of film guys who want to make a movie about Don’s life. Don says, “why the hell not” and they begin collaborating on a screenplay. But before Don knows it, he realizes that his life isn’t all that exciting. He spends most of his time either in front of his computer being a writer or in front of his tv living vicariously through others. When he looks at his life through the lens of a story, he sees that he is living a very bad and a very boring story. So he decides to write a better one by living a more intentional life. He actually asks out girls instead of daydreaming about it. He loses weight, starts biking and eventually bikes all the way across the US. He starts up a non-profit for underprivileged children. Basically, he starts living a life that is inspiring and meaningful and beautiful. Then he encourages his readers to do the same thing.

I really needed this book when it came across my path. I was feeling stuck in life, not sure what my purpose was. I know, I know. I can hear it now, “But you’re a mom, and that is one of the most important jobs in the world; you should be proud of that role.” Believe me, I am. But I’m not content with that being my only role because I have other passions, particularly cooking, that can’t be explored in the context of motherhood.

Sure, I cook (multiple times at least) every single day for my kids and sometimes I do really enjoy it and find it rewarding. But what I really love is having the kitchen to myself with the ingredients for a challenging new recipe sprawled out on the counter before me, and all day long to learn and explore and finally create a piece of edible art to share with my family or friends. I miss that.
So after reading Mr. Miller’s book, I decided to take my life by the reins and look for opportunities to pursue my passion for cooking outside of my role as “Mama”. And tomorrow I get to make good on one of those opportunities: I’m doing a cooking demonstration for the Jars of Hope Food Pantry at the Gap Family Center--while families are picking up their groceries from the pantry, I’m going to be demonstrating how they can use what they’re receiving to make healthy, tasty meals at home.
It’s amazing to me how your soul seems to come alive when you are able to combine your passion with serving others. All week I’ve been concocting different kinds of recipes in my kitchen like some sort of mad scientist, and it’s been oh so fun. But at the end of the day, cooking is just a bunch of steam and victuals if you have no one to share it with. So that is why I’m most excited about going to the pantry tomorrow. I’ll have the chance to get to know the families, the moms and dads who may need a little encouragement or hope, or another grown up to talk to, or just something tasty to eat. I get to use my knowledge of food and cooking for more than just satisfying my own palette, a welcome change, I must say.
But for your at-home enjoyment, here’s a little recipe that I’ll be handing out at the pantry tomorrow…
Mai’s Brown Sugar Walnuts
2 tbsp. butter
¼ c. brown sugar
¼ tsp. salt
¼ tsp. cinnamon
1 c. walnut pieces
Melt butter in small saucepan over low heat. Add sugar, salt, and cinnamon, and stir until sugar dissolves and mixture just starts to boil (don’t burn-this will only take about a minute or two). Add walnuts and stir to coat nuts. Pour nuts onto piece of foil to cool.
I dare anyone to come up with a food that these would not taste divine on. Sweet potatoes? Yes, please. Yogurt? Absolutely. Pancakes? Hell, yeah! Roasted Pork Loin? Yep. Brie? Of course, and now I’m really beginning to tire of this exercise. They taste good on anything, people. Just eat them. Period.
Oh, and read Don Miller’s book. Period.

Wednesday, August 11, 2010

Hell Hath No Fury Like a Red Hot Pepper

The tomato influx from our garden is starting to subside now. I’m a little sad about it, to be honest. When the zucchini plants dried up, I have to admit that I did say a quiet prayer of thanksgiving; I can only eat so much zucchini in all its various forms before I start to tire of it. Not so with tomatoes. There are just so many options: spaghetti sauce, hot sauce, tomato soup, blt’s (if I’m not feeling too guilty about pork on that particular day), tomato and herb cream cheese sandwiches… I think I could go on indefinitely.

But my favorite thing to do with tomatoes this summer is to cook up a nice big batch of salsa. My intentions have been good. Every time I make a batch, I imagine that I will set back at least ½ of the amount to freeze for the winter. I’ve made about 5 batches by this point, and I’ve only set back a single one-cup container in my freezer so far; we’ve become serious salsa addicts around here (I’m starting to think we have very addictive personalities, my husband and I).

This salsa can be as hot or as mild as you choose. We love hot food in our family so I tend to throw in at least 4 or 5 thai chilies just to amp it up a bit. If you decide to go that route, please, please, please be careful as you are chopping and handling the hot peppers. I am currently typing with severely burned fingertips because I chose to ignore my good sense when chopping up some peppers for a curry I was making tonight. For your enjoyment, I’ve typed out the inner dialogue that took place about this topic (G.S.= Good Sense):

G.S - “With all this handling of hot peppers, you should probably put some gloves on”.
Me – “That is so stupid. It’s not like I’m an amateur here.”
G.S. – “I’m not saying you’re an amateur, I’m just saying that there are always those warnings when recipes call for hot peppers and I don’t think they put them there for no reason.”
Me – “When you show me a picture of Jamie Oliver sporting big rubber yellow gloves to chop up a few chilies, then I’ll think about wearing them. But until that time, shut it.”

Well, Jamie Oliver must have hands of iron or keep pictures of his gloved hands under lock and key, because, wow, it really hurts. Granted, I’ve chopped plenty of small peppers in my day without donning plastic mittens, but the ones I was cutting today were some big boys and I think they had a debt to settle with me. Ouch.

Mai Stovetop Salsa

1 tbsp. extra virgin olive oil
1 c. onions, chopped
3 garlic cloves, chopped
5 (or more) red thai chilies, chopped (Leave this ingredient out if you don’t want the heat. Or if you’re really feeling brave, add a habenero in there. That’ll really light you up.)
3 banana or Hungarian wax peppers, deseeded and roughly chopped
10 ripe medium-sized tomatoes, seeded and cut in 8ths
1 ½ tsp. chili powder
½ tsp. cumin
¾ tsp. sea salt (You can use regular salt, too. Sea salt just makes me feel sophisticated.)
2 tbsp. chopped cilantro
1 lime

Heat the oil in a large saucepan. Add onions, garlic, and both kinds of peppers. Saute for 2 or 3 minutes, just to soften them up. Add the tomatoes, chili powder, cumin, and salt. Cook over medium heat for about 15 to 20 minutes or until all the veggies and tomatoes are really soft and mushy. Let the mixture cool for about 10 minutes or so before putting in the food processor and pureeing to your desired consistency. Add juice from 1 lime and cilantro, and serve.

Now I must go coddle my poor little throbbing, aching fingers. Have a great weekend, everyone!

Friday, August 6, 2010

A Hero To Rescue You from Your Appetizer Fears

Here’s the scenario: You’re invited to a get-together and when the hostess starts passing out dishes for everyone to bring, you get tagged with the elusive “appetizer”. I don’t think there is any other course of a meal that can send my insecurities into a flurry than appetizers, and here’s why.

You certainly don’t want to be the schmuck that shows up with a jar of salsa and a bag of tortilla chips because, well, frankly, when the main course of beautifully seasoned salmon hits the table, your offering looks like a pile of wood chips with a motor oil dipping sauce. But preparing a good appetizer can seem overwhelming because a lot of really good, and impressive, appetizer recipes take time, especially if you’re really hoping to “wow” your friends.

To everything there is a season. There may come a day, once again, when I have 4 or 5 extra hours just floating around in my day where I can spend time making fancy little apps without children shimmying up and down my legs and asking for snacks on a continuous basis. That day will come. But it isn’t a reality in my life at the moment so I’ve gotta find shortcuts that get me what I want but with half the effort and time. If you’re looking for the same sort of deal, for similar or very different reasons, I’ve got a little something special for you.

This recipe is a beautiful, yet easy, little appetizer that my sister-in-law passed my way, and I got to try it out a couple of weekends ago. These individual quiches are so tasty and cute, and, bonus, there are no troublesome pastry crusts to get you all worked up into a lather. You do some simple sautéing, a brief mix of all the ingredients, and pour into your tartlet pans. A word of caution, however. To make your life easier and these little babies as cute as they can be, make sure you rub down your tartlet pans with plenty of butter to help the tartlets come out easier.

Suzanne’s Mini Spinach Quiches

1 tbsp. butter
1 onion, chopped
1 garlic clove, minced
1, 10oz., pkg. frozen chopped spinach, thawed and drained
6 eggs, beaten
½ c. heavy cream (This ingredient was not in the original recipe but I just can’t pass up a chance to add a little extra creaminess to any recipe.)
2 c. shredded Colby-jack cheese
½ tsp. salt
¼ tsp. pepper

Preheat oven to 350 degrees. Give your tartlet pans a good coating of butter.
In a large skillet, sauté onions and garlic until soft. Stir in spinach and continue cooking till excess moisture has evaporated. Let mixture cool slightly while you mix eggs, cream, cheese, salt, and pepper in a large bowl. Add spinach mixture and stir to blend. Pour into mini tartlet pans and bake for 10 to 12 minutes.

When I made these a couple of weeks ago, I didn’t really have time to experiment with garnishes. I was literally scooping them out of the pans while my husband and kids were waiting in the car, ready to leave for the dinner party. But I imagine that a side of fresh salsa or even a small dollop of sour cream and a tiny sprig of cilantro would gussy up these little ladies even more.
Thanks, Suzanne, for this great recipe! Have a delicious weekend, everybody!

Sunday, July 11, 2010

Fresh Salsa in the Jarred Salsa World

Shortly before our family made the move from Northern Virginia to Lancaster County last fall, some wonderful friends, Mark and Paula, had us over for a farewell dinner of sorts. While Paula is world-famous for her fabulous pasta with Vodka Sauce (a recipe that I may be able to coax out of her one day and share with all of you), that evening she had made fantastic quesadillas with salsa and guacamole.

For some reason the memory of that salsa stuck with me for several days afterwards; I was craving it, wishing I had just a spoonful of it to put on everything I ate. Why was obsessing over salsa? Granted, I did have a newborn so I was really sleep-deprived and suffering from serious bouts of the “nursing-munchies”, but I knew there was something deeper.

Then it hit me: her salsa was fresh, and hence, incomparable to anything I got off the shelf at the grocery store.

See, I just never bothered to make my own salsa. Call me silly, but I was one of the millions out there who thought that the jarred stuff wasn’t really much different than what I could make myself. Wow, was I wrong. And I simply can’t go back now. I haven’t had a bottle of store-bought salsa in my fridge since that fateful dinner at Paula’s house ten months ago.

Perhaps you’ve been making your own salsa for years, so this plea may fall on some deaf ears, but if fresh salsa-making is new to you, I implore you to give it a try. It will take you about 10 minutes to chop everything up, and you can make it for less than half the cost of what you pay in the grocery store for one of those sub-standard jars. Plus, "fresh" is always better for you.

Below, is my personal salsa recipe. Like I said, I’m a newbie at this so the list of ingredients isn’t going to blow your mind with creativity, but for some of you, it might be a good starting point.

Mai’s Better-than-Jarred Fresh Salsa

2 cups seeded and chopped fresh tomatoes (Don’t go trying to sneak canned tomatoes in here. This is “fresh” salsa so all the ingredients need to be “fresh”. Last week when I did my bi-monthly salsa-making, I added some green tomatoes from our garden to the salsa and I liked what it added to the ensemble so if you've got some on hand, give it a try.)

½ c. chopped sweet onion

1 jalapeno, minced (I may have mentioned before that I like my food spicy hot so this may be a no-go ingredient for you. If you are somewhere in the middle of the road on this issue, go ahead and add the jalapeno but just leave the seeds out.)

1 clove of garlic, minced (Again, “fresh” is the key word here. Don’t go using that jarred stuff; it’s just not the same. Really, it will literally take you about 30 seconds to chop a clove of garlic and if you are so hung up on your fingers not getting all smelly, just wrap some Saran over the hand that’s touching the garlic. See, now I’ve taken away all your excuses.)

1 tbsp. chopped fresh cilantro (If you don’t like cilantro, by all means, leave it out. I love, love, love it so I always include it.)

Juice from ½ a lemon

Salt and Pepper to taste

Toss all ingredients together in a bowl and you’re done…if you like your salsa chunky. Perhaps, you are like my husband and chunks in your salsa gives you the shivers. In that case, just throw it all in a food processor and blend it up. It’s best if you make it at least several hours before you are going to serve it so that the flavors can meld together in the fridge. But if you forgot to plan ahead and serving time is upon you, don’t worry: it will still be eons better than what you get out of those jars.

As I said before, I’m just starting out on this salsa-making road so I would love any suggestions or tips from you salsa-gurus out there!

Wednesday, July 7, 2010

The Zucchini Challenge Winners- Part 2

The winner of the “savory” category of the Zucchini Challenge was up against some very tough competition. If you are looking for a good zucchini recipe, check out the comments from the intial Zucchini Challenge post because there are loads of great recipes there.
But I chose today’s winner because, frankly, the oppressive summer heat has put me in a semi-bad mood, and I’m kind of fed up with standing next to a scorching hot stove for hours on end trying to make use of this zucchini influx. So I present to you a beautiful, tasty, healthy and “minimal cooking required” recipe that almost makes the 100 degree temp outside bearable…

Zucchini Boats submitted by Kim and Caitlin!!!

A great big thank you to Kim, and her wonderful daughter Caitlin, for bringing this recipe into my world. It took me no more than 25 minutes to prep and cook this recipe. Granted, my zucchini aren’t as cute and petite as the traditional zucchini folks are finding at the markets and groceries these days. Most of my girls are a little thick around the middle and freakishly long, so they would make something more akin to zucchini cruise liners than zucchini boats, but thankfully my husband was able to scavenge a couple reasonably sized zucchini from the garden for this recipe.

Chances are your zucchini are still quite a bit smaller than what I had to work with, so I haven’t put any amounts next to the ingredients in this recipe. Just mix up however much of each item you think you need to fill the zucchini you’re working with.

Zucchini Boats

Kalamata olives
Chopped tomatoes
Crumbled feta cheese
1 clove of garlic, minced
Dash of salt
Fresh basil, chopped
Zucchini, halved lengthwise and center seeds scraped out
Olive oil

Preheat oven to 400 degrees. Simply mix together the first 6 ingredients in a bowl. Fill zucchini with mixture, place in a baking dish, drizzle with olive oil, and bake until zucchini begin to soften; mine took about 15 minutes.

My brother-in-law Ben had the brilliant idea of adding a dollop of hummus on top of his, which sounds amazing but I didn’t actually try it because I had already devoured my “boat” by the time he made the suggestion. But he seemed to be enjoying himself so I highly recommend you giving it a try.

I just want to again thank all of you for your suggestions and encouragement throughout The Zucchini Challenge, and a special thanks and congrats to Sara and Kim for their great recipes!!! Till tomorrow…

Wednesday, June 23, 2010

A Lesson in Cedar Plank Safety

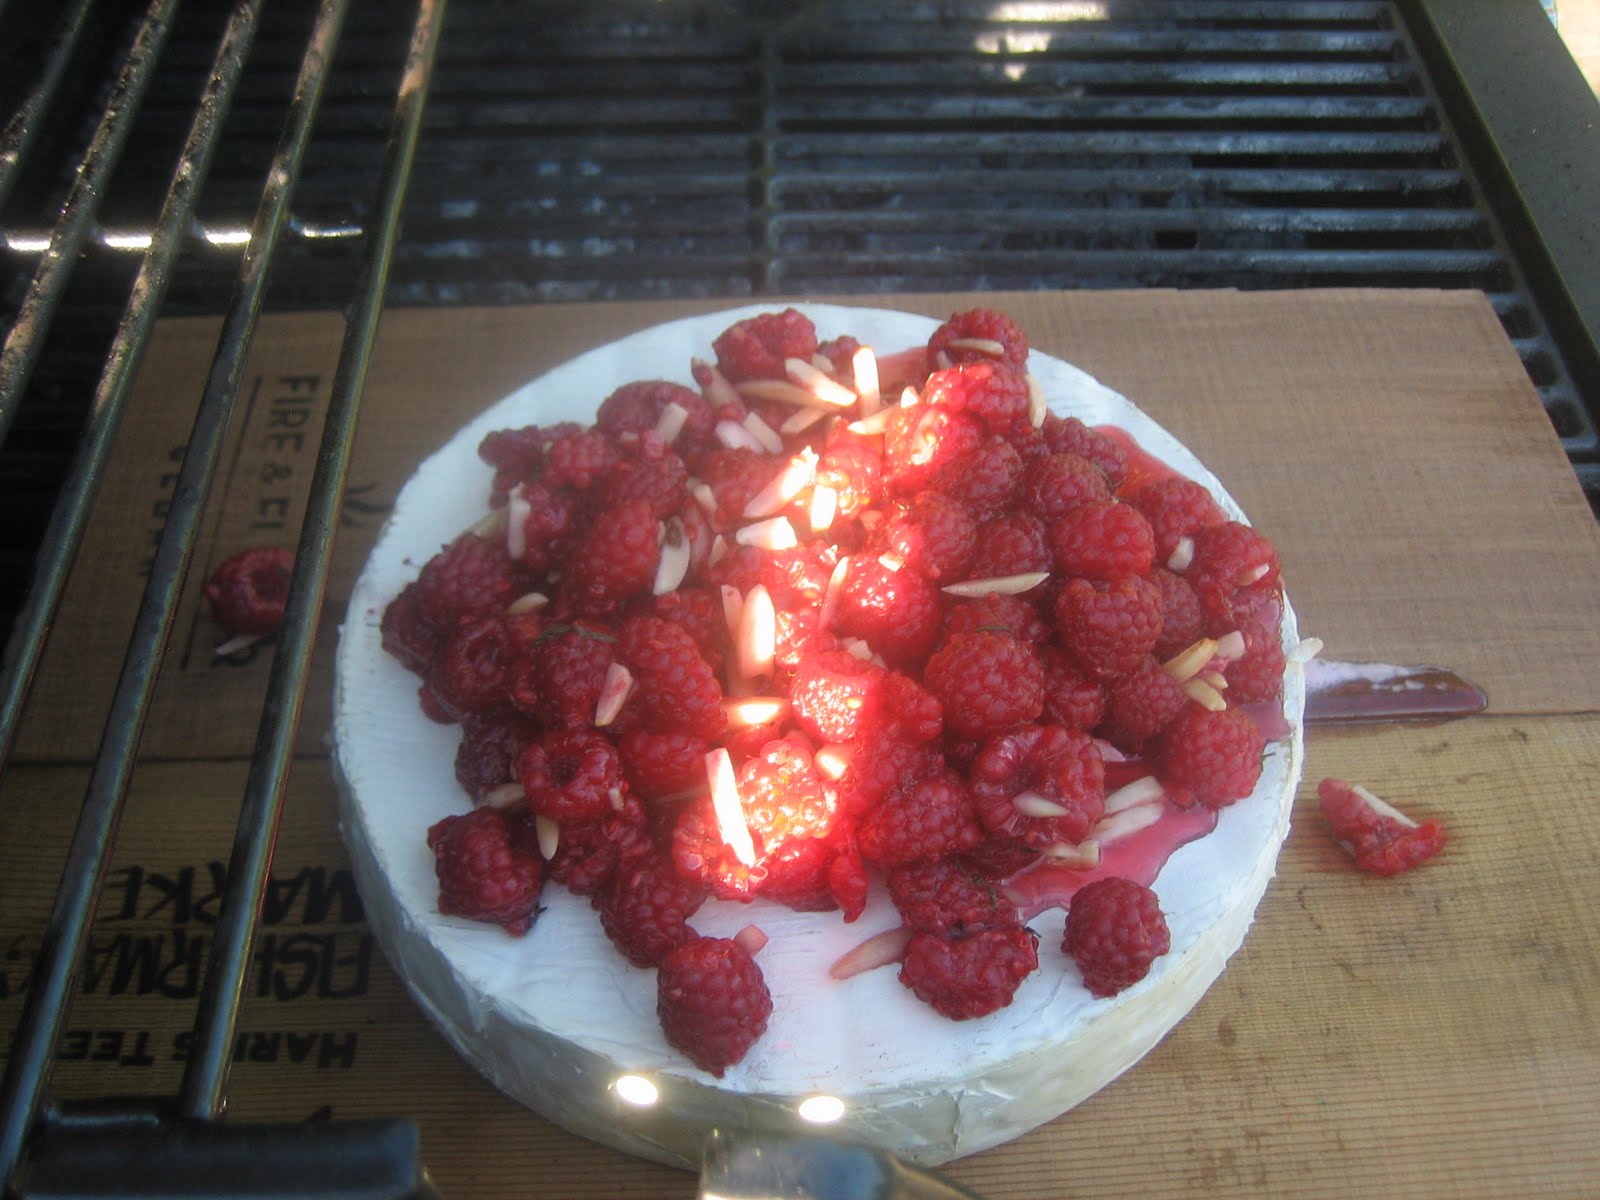
I love cheese. I especially love brie. And I absolutely adore baked brie with pecans and brown sugar. But that combination just doesn’t scream “summertime”, and I needed an elegant, summery appetizer to take to dinner at a friend’s house. Then I remembered this recipe I had tucked away since last summer when I had cut it out of a magazine: Grilled Brie with Raspberries and Almonds. Perfect!

Now, if you have never grilled with cedar planks before, please read the rest of this entry very, very carefully.

You must, I repeat, MUST soak your cedar planks for several hours (let’s just say 4 hours to be safe) before using them to grill. And then you must use them immediately. Do not take them out of the water at 5pm, set them in a hot car for two hours while dropping off your children at your in-laws and chatting it up with other dinner guests at the party, and then whisk them out and assume to use them without them catching fire. This will not happen; they will most assuredly catch fire, and attempt to consume in flame and char everything placed upon them.

The beauty of this story, and this recipe, is that the cheese survived. Yes, I committed the aforementioned transgressions with a rather expensive wheel of brie, and all the accoutrements listed below, and although the cheese looked rather frightful after my husband so bravely rescued it from the flame, it still tasted divine. So even if you don’t heed my advice about the cedar planks, I feel confident you will still succeed and have a lovely, smoky-flavored appetizer to serve your guests. It won’t look like much, but it will taste divine.

Grilled Brie

1 large wheel of Brie, or two small ones
2 pints fresh raspberries
3 tbsp. honey
½ c. slivered almonds (Or whatever nut you fancy. I’m may be a stickler on syrup and parm, but I’m wide open when it comes to nuts.)
Crackers or French bread for serving
1 cedar plank, soaked for a very, very, very long time.

As long as your cedar plank is soaking wet, the rest is a cinch. Put your brie on the plank, add the toppings, plop on a medium heat grill and let cook until the cheese gets nice and gooey, about 15 minutes, or until huge flames lick up from under the grill lid and your head is nearly engulfed in hell fire when you go to check on your once beautifully adorned brie. Either way, the cheese is done and ready to be slathered on crackers and enjoyed, but only after all burns and singes have been properly treated.

No seriously, it wasn’t that bad. Please don’t be afraid of this recipe because it is really really good. Give it a go.