Showing posts with label vegetarian. Show all posts

Monday, January 2, 2012

A New Year's Challenge (With Vegetarian Chili on the Side)

Two Thursdays out of most months, I scurry around my kitchen assembling all the necessities for cooking (pots, utensils, aprons, etc.), stuff it all in an empty box or laundry basket, load it in my minivan along with my two oldest children, and drive the short distance to the local food pantry where we volunteer.

My role there is simple: cook.


I receive the same items for a meal that the food pantry patrons will receive at that day’s distribution. And with those ingredients, I create recipes that will give them options for interesting and healthy meals, then I make those recipes for the patrons while they’re waiting for their opportunity to gather their rations from the pantry.


I love to cook, so when this role presented itself, the fit felt perfect. But over the past year, the cooking has become secondary. Even now emotion chokes in my throat as I think of last month’s demonstration and the petite, white-haired woman who, with red-rimmed eyes, relayed to me the dire circumstances of her husband’s health, and how, without insurance, they couldn’t afford to buy the medication that keeps him breathing.


“I’m so so sorry,” I whispered, tears blurring her form before me as she spoke.


“He says he’s not afraid to die, but he’s not ready yet,” her voice quivered as she whispered the next few words, “and I’m not ready to lose him.” As I slid my arms around her trembling shoulders, shaking with her stifled sobs, I felt helpless. I felt small. I felt ill-equipped.


And I felt that I was right where I needed to be.


In the New Year, so often our resolutions center around self-improvements we hope to achieve through more effort: lose weight, eat healthier, exercise more.


I challenge you this year to follow your passion (cooking, art, singing, photography, etc.) to a place where you don’t have the solutions or the answers, to the place where you are simply arms open wide ready to welcome the broken-hearted.


And just see the self-improvements that come from that.


Today’s recipe is taken from one of the cooking demos I did this past year. It’s cheap (a plus after the havoc the holidays can have on our finances), healthy (because the holidays tend to wreak even more havoc on our waistlines), and oh-so-easy.


Mai’s Vegetarian Chili


2 tbsp. olive oil


1 c. chopped onions or 1 tsp. onion powder


1 garlic clove, chopped or ½ tsp. garlic powder


1 tbsp. chili powder


1 tsp. cumin


1, 28 oz. can of crushed tomatoes


1, 14 oz. can of pinto beans, drained


1, 14 oz. can of black beans, drained


1, 14 oz. can of sweetcorn, undrained


1 c. vegetable broth (if you’re not too worried about the whole “vegetarian” bit, beef broth works nicely here)


¼ tsp. ground pepper


1 ½ tsp. salt


In a large pot, heat olive oil. Add onions and garlic, and sauté for 5-8 minutes, or until veggies are softened. Add chili powder and cumin and sauté for another minute. Then add tomatoes, beans, corn, pepper, and salt (if you made the bean salsa recipe from last week, feel free to throw your leftover beans and corn into the chili at this point for a slightly chunkier version). Simmer for 30 minutes and serve.


My kids can’t get enough of this chili. When I’m feeling down in the dumps, I simply whip up a pot of this and sit back in my easy chair to absorb all the compliments. When I made this for lunch last week, my daughter, after eating a bowl full, stormed into the bathroom where I was showering and declared, “Mom that chili was delicious!” and then quickly exited. Gotta love that kind of affirmation!


Saturday, December 31, 2011

New Year's Eve Special: Easy Bean Salsa

You awake bleary-eyed as the fog of your dream world quickly clears and the morning light snaps your consciousness to the present-

It’s New Year’s Eve tonight and you have nothing prepared.


Fear not, my holiday-weary friend; I’ve got the salsa covered. If you’re like me, you hate to give that frazzled appearance with your food choices by serving up jarred salsa and dips. You want to look like you’ve been planning this spread for weeks, cooking for days, and tablescaping for hours. So I provide for you a short-cut.


Today’s recipe consists mostly of pantry staples with a few fresh veggies thrown in to add that “homemade” flair. In 10 minutes flat you can have this baby in your fridge and the flavors melding while you put the finishing touches on dessert or scrub off all the globs of old toothpaste stuck to the bathroom counter (that’s where you’ll find me).


Note: If you are expecting a big crowd, this recipe can easily be doubled or tripled depending on your need.


Mai’s Easy “Peasy” Bean Salsa (I love the pun here.)


1 cup of canned black-eyed peas*


1 cup of canned black beans*


1 cup of canned white sweet corn*


1, 10oz. can Mexican-style Rotel tomatoes, drained


½ c. green pepper, finely chopped


1 green onion, both white and green parts, finely chopped


1 garlic clove, finely chopped


Salt and pepper to taste


Tortilla chips, for serving


Mix everything (except chips, of course) in serving bowl. Cover with plastic wrap and chill for several hours to allow all the flavors to dance and mingle. Serve with tortilla chips.


*You will have leftover beans and corn, but don't even dream of throwing them out! Tune in Monday for a delicious vegetarian chili that will make great use of those extras.


Happy New Year, friends!

Saturday, September 4, 2010

Money, Money, Money: Revolution Roadblock #2

A big thanks to all of you out there who decided to get involved in the charity:water project that was introduced on Tuesday; it feels pretty great when we get to be a part of something bigger than ourselves by helping people other than ourselves. Please pass on the word and let's reach that goal!!

Today, I'm back on my old soap box again. When attempting a Food Revolution (like I am) you have to be aware of the hindrances that keep something like this from really taking off. A couple weeks ago I tackled the issue of time aka Revolution Roadblock #1.

I think the next biggest obstacle will probably ring true for quite a few of you out there; I know it does for me. I think I’ve mentioned before that I am a stay-at-home mom and my husband is a writer and we have four little babes, so we aren’t exactly rolling in the old greenbacks.

I appreciate the fact that buying organic or even fresh fruit and veggies isn’t always (most times, never) the most budget-friendly choice. The truth is, I don’t ALWAYS buy organic. I buy it when I can. I basically have a hierarchy system to help me figure out what and when I should buy organic, which I will share with you tomorrow.

But while I am acutely aware of the challenges a strict budget can present when trying to feed your family a healthy diet, I by no means think it is impossible. Last week I had a pathetically small grocery budget to work with because I had a few too many splurges in the middle of the month which left me with very little for the end of the month. I kind of have a habit of doing this.
Honestly, though, I kind of like the challenge. There's something really satisfying in knowing that I've fed a family of 6 with less than $5 worth of ingredients. Okay, I don't want to do this every night, but occasionally it is kind of fun. And below is most definitely one of my favorite budget-friendly meals of all time for these reasons, in no particular order:

1. Because it's got an Indian flair to it, and I absolutely adore Indian food. I could honestly eat it every day for every meal, and that's no where close to being an exaggeration. Just ask my husband.

2. I made this recipe last Wednesday afternoon while my kids were spending a couple hours at their grandparents' house. When my son walked in the door at dinnertime, he shouted, "It smells AMAZING in here!"

3. It tastes even better than it smells. My kids, ages 1 to 7, all loved it and cleaned their bowls. Since there were no leftovers to scavenge, I had to eat a second bowl myself. Oh, darn.

4. It's vegetarian, so it's easy on my conscience and my pocketbook.

With no further ado:

Indian Lentils and Rice

1 tbsp. olive oil
3/4 c. chopped onion
3 garlic cloves, minced
1 tbsp. minced peeled fresh ginger (Don't try and use ground ginger in this and think you're going to get away with it. A little knob of fresh ginger from the produce aisle will cost you about a quarter. I think you can splurge.)
1 1/2 tsp. curry powder
½ tsp. ground cumin
4 c. water
1 ½ c. dried red lentils (You can find these in the Hispanic section of your supermarket. If you've never used lentils before and you have a tight food budget, may I introduce you to your new best friend.)
1 c. chopped fresh tomato (The other day when I made this, I didn't have any tomatoes so I just used 1 1/2 c. tomato sauce and reduced the water to 3 cups. Worked beautifully so consider that as an option.)
1 tsp. salt
¼ c. chopped fresh cilantro
3 c. freshly cooked rice

My kids are a little nutso about their food having a smooth texture, so I just go ahead and whiz the onion, ginger, and garlic together in the food processor. Heat the olive oil over medium heat and add the onions, ginger, and garlic and saute for a couple minutes, just to soften. Then add the curry powder and cumin. Stir that around in the pan for about 30 seconds, just to get the spices nice and toasted. Add the water, lentils, tomato, and salt. Simmer for about 20 minutes, or until lentils are soft. Add the chopped cilantro, pile on top of the rice, and you are ready to tuck in.

This recipe will usually feed my entire family for dinner and have enough leftovers for me to sneak in the next afternoon and scarf the rest down for lunch before my husband catches wind of my devilry. Hee, hee.

Monday, August 23, 2010

Revolution Roadblock #1: Time

I think I’ve established the fact that this revolution has to start in our very own homes, right dead-center in our kitchens. It’s not the responsibility of the big wigs and the mega-stores; they aren’t the ones shoveling this garbage into our mouths and the mouths of those we love. Folks, we’re grown ups and it’s about time we start taking responsibility for our actions instead of expecting everyone else to take care of our problems for us.

And that’s the crux of this food revolution. We need to figure out the root of the problem and fix it so that we can make permanent, healthy changes in our lives. I don’t believe that we all just love to ingest loads of chemicals and preservatives in everything we consume. I think, deep down, we want to serve our families “real food”, but somehow we keep falling short. And I’m going to tell you right now the first reason that we resort to this food pollution:

Time.

We simply don’t have enough of it. So when the kids are whining or your stomach is growling, you just grab for the easiest option. But it doesn’t have to be food laced with hydrogenated oils and dyes. There are other options, and today I give you one of our family’s favorites. But first, a story.

Every Monday afternoon, my kids and I take about a 15 minute ride to a local dairy where we get our milk. I’m telling you right now, if you can get your sweet little hands on some local milk, you are in for a treat you won’t easily give up. This milk tastes superb, and it comes in glass bottles, which makes me feel like Donna Reed and a hippie tree-hugger all at the same time (and I really kind of like the feeling).

Anyway, we always tend to make our little trek right before dinnertime, since that’s when my youngest tends to get up from his nap, which means that we get home just about the time the kids’ bellies need filling (unless, of course, I cave and we eat ice cream cones at the dairy and consider dinner done—this happens about 50% of the time; please don’t judge me.)

Two weeks ago, I walked through the front door with the first scenario (hungry bellies) on the horizon. I had mere minutes before the natives would turn to cannibalism so I had to act fast. My life line came in the form of a quickly blitzed pesto, prepped while the pasta was boiling on the stove. No lie: this meal was on the table in 10 minutes flat, and I simply couldn’t keep their plates filled, they were eating it so fast.

Frozen pizzas and ready-made dinners do not need to be our heroes in these types of situations. I think we just need a better call list when these scenarios present themselves.

Mai’s Pesto

2 cups fresh basil (You need a lot of basil for this dish. When you are measuring for this, make sure you pack in the basil.)

¼ c. walnuts, toasted (Now the traditional version of pesto is made with pinenuts and they can certainly be substituted here. My kids aren’t huge fans of meat so I like to pack in as much protein as I can when I can and I’ve just happened to have walnuts in my pantry the last couple times I’ve made this.)

2 garlic cloves

1/3 c. freshly grated parmesan cheese (Okay, a confession. Last time I made this I didn’t freshly grate the cheese. Yes, I used pre-grated (no, not the stuff in the green bottle—need I remind you, that isn’t even cheese). I’m not ashamed to admit this because sometimes we just can’t do everything perfect. Did the pesto turn out just fine? Absolutely. Would it have been better with freshly grated cheese? Absolutely. I leave the choice up to you.)

1 tsp. salt

¼c. to ½ c. olive oil (You’ll have to eyeball this one. You want the pesto to have a thin enough texture to coat your pasta noodles, but you definitely don’t want it to be too oily.)
1 lb. pasta, cooked according to package directions (if you’re short on time, angel hair pasta is always a quick one. If you’ve got a few more minutes to spare, try a whole wheat penne pasta.)

Whiz the first 4 ingredients in your food processor (blender will work, too) until everything is finely chopped. Toss in the salt (check afterwards, you may want more), then add the olive oil. Give it another whiz and add more oil if needed.

Simply toss your pasta with the pesto, sprinkle a little extra parm on top, and dinner’s on the table. You could even add some fresh tomatoes to the party, for added fun.

Per the suggestion of my wonderful friend Maria, I would love all of you to share the worst ingredient lists you’ve found this week. The item may or may not be from your pantry (and you are not required to disclose if it is). So excited to see what you all come up with!!!

Friday, August 6, 2010

A Hero To Rescue You from Your Appetizer Fears

Here’s the scenario: You’re invited to a get-together and when the hostess starts passing out dishes for everyone to bring, you get tagged with the elusive “appetizer”. I don’t think there is any other course of a meal that can send my insecurities into a flurry than appetizers, and here’s why.

You certainly don’t want to be the schmuck that shows up with a jar of salsa and a bag of tortilla chips because, well, frankly, when the main course of beautifully seasoned salmon hits the table, your offering looks like a pile of wood chips with a motor oil dipping sauce. But preparing a good appetizer can seem overwhelming because a lot of really good, and impressive, appetizer recipes take time, especially if you’re really hoping to “wow” your friends.

To everything there is a season. There may come a day, once again, when I have 4 or 5 extra hours just floating around in my day where I can spend time making fancy little apps without children shimmying up and down my legs and asking for snacks on a continuous basis. That day will come. But it isn’t a reality in my life at the moment so I’ve gotta find shortcuts that get me what I want but with half the effort and time. If you’re looking for the same sort of deal, for similar or very different reasons, I’ve got a little something special for you.

This recipe is a beautiful, yet easy, little appetizer that my sister-in-law passed my way, and I got to try it out a couple of weekends ago. These individual quiches are so tasty and cute, and, bonus, there are no troublesome pastry crusts to get you all worked up into a lather. You do some simple sautéing, a brief mix of all the ingredients, and pour into your tartlet pans. A word of caution, however. To make your life easier and these little babies as cute as they can be, make sure you rub down your tartlet pans with plenty of butter to help the tartlets come out easier.

Suzanne’s Mini Spinach Quiches

1 tbsp. butter
1 onion, chopped
1 garlic clove, minced
1, 10oz., pkg. frozen chopped spinach, thawed and drained
6 eggs, beaten
½ c. heavy cream (This ingredient was not in the original recipe but I just can’t pass up a chance to add a little extra creaminess to any recipe.)
2 c. shredded Colby-jack cheese
½ tsp. salt
¼ tsp. pepper

Preheat oven to 350 degrees. Give your tartlet pans a good coating of butter.
In a large skillet, sauté onions and garlic until soft. Stir in spinach and continue cooking till excess moisture has evaporated. Let mixture cool slightly while you mix eggs, cream, cheese, salt, and pepper in a large bowl. Add spinach mixture and stir to blend. Pour into mini tartlet pans and bake for 10 to 12 minutes.

When I made these a couple of weeks ago, I didn’t really have time to experiment with garnishes. I was literally scooping them out of the pans while my husband and kids were waiting in the car, ready to leave for the dinner party. But I imagine that a side of fresh salsa or even a small dollop of sour cream and a tiny sprig of cilantro would gussy up these little ladies even more.
Thanks, Suzanne, for this great recipe! Have a delicious weekend, everybody!

Monday, July 19, 2010

Jamie Oliver Makes His First Appearance on Manic Monday

I'm not sure what the rest of you are doing for Manic Monday, but I'm serving up some fresh, hot leftovers. We had houseguests this weekend, and it always seems that when I have visitors, my refrigerator gets jam-packed with leftovers, which works out great, because the last thing you have time to do after a busy weekend is spend time in the kitchen cooking. So I'm taking a break from the kitchen today, and planting myself in the laundry room because I have LOTS of wash that needs attending.
But for those of you with the "bare-fridge blues", here's a wonderfully simple recipe from my favorite chef at the moment, Jamie Oliver. You can't go wrong with any of his recipes but this one in particular is tailor-made for Manic Monday. Now, the laundry is calling so I leave you with in Jamie's hands:

Baked Camembert Pasta by Jamie Oliver

8 oz. round of Camembert cheese (I haven't tried this with brie but I have a pretty good feeling that it would work just as well. Give it a try and let me know how it turns out.)

2 cloves of garlic

1 sprig fresh rosemary

extra virgin olive oil

sea salt and freshly ground black pepper

1 lb. dried rigatoni

6 cups (approx. 6 oz.) fresh spinach leaves

4 oz. Parmesan cheese

Preheat you oven to 350 degrees. Open the box of cheese and unwrap it. Place it back in the wooden container. Score a circle into the top of the skin, then lift it off and discard. Peel and finely slice the garlic. Pick the rosemary leaves off the woody stalk. Lay the garlic slices on top of the cheese, sprinkle with some pepper and drizzle with a little extra virgin olive oil. Scatter over the rosemary leaves and gently pat with your fingers to coat them in oil. Grate the Parmesan.

Place the box of cheese on a cookie sheet and put it into the preheated oven for 25 minutes, until golden and melted. Meanwhile, bring a large pot of salted water to boil. When your cheese has 10 minutes left to cook, add the rigatoni to the pot and cook according to the package instructions. When the pasta is cooked, add the spinach to the pan- it only needs 10 seconds or so. Drain the pasta and spinach in a colander over a large bowl, reserving some of the cooking water. Return the pasta and spinach to the pot and let it wilt. Drizzle with a couple of good lugs of extra virgin olive oil and add the grated Parm. If the sauce is too thick for you, add a splash of a the reserved cooking water to thin it out a bit. Season with salt and pepper and give it a good stir. Remove the cheese from the oven.

Divide the pasta between your serving bowls. Either drizzle the melted Camembert on top or pop the box of cheese on the table and let everyone help themselves to a lovely, gooey spoonful.

Tuesday, July 13, 2010

A Summertime Classic Cookbook

Okay, so I feel really bad about making you get out your slow-cooker in the dead of summer for yesterday’s recipe. Therefore, today I’m going to do my first cookbook review of a collection of recipes that is dead set on keeping the heat in your kitchen to an absolute minimum.

The cookbook is No Cook Pasta Sauces by Joie Warner. I received it as a wedding gift 10 years ago and every summer I whip it out when the heat outdoors gets to my brain and puts me in a cooking coma.

I love this cookbook because the recipes are simple but diverse so one day you could have linguine with an Italian flair, perhaps Lemon Basil Pesto, and the next day, from the same cookbook, you can satisfy a hankering for Chinese by whipping up some vermicelli with Asian Peanut Butter and Garlic Sauce. It’s such a versatile book and nearly all the sauces can be whipped up without the stove, or simply warmed in a heatproof bowl over your boiling pasta.
The recipe below is one of our family’s favorites from this cookbook; hope you all enjoy it as much as we have through the years!

Creamy Roasted Red Pepper Sauce

1 jar (7oz.) roasted red peppers, well drained and pureed in food processor
1 large garlic clove, finely chopped
Grated zest of 1 medium lemon
¼ c. butter, at room temperature
½ tsp. salt
Freshly ground black pepper
¼ c. freshly grated Parmesan cheese, plus extra for serving
1/3 c. fresh basil leaves, cut into strips
8 oz. fettucine

Combine pureed red peppers, garlic, lemon zest, butter, salt, pepper, and Parmesan cheese in pasta serving bowl. Set aside to warm to room temperature or, preferably, place the bowl (be sure it’s heatproof) over the pasta pot to melt the butter while heating the water. Once the water comes to a boil, remove bowl and set aside.

Cook pasta in large pot of boiling salted water until al dente. Drain pasta well and immediately add to sauce in bowl. Sprinkle with basil and toss. Serve at once with extra Parmesan cheese. Serves 4.

Tune in tomorrow for a recipe that is one of my dad’s all-time favorites, and it also earned him the most chilling stink eye I’ve ever bestowed on another human being.

Crockpot Refried Beans: Heart Healthy and Saving Cows

I know this isn’t crockpotting weather, folks, but desperate times call for desperate measures, and in case you didn’t notice, we’re in a recession. So it’s time to tighten the purse strings and pull out the slow cooker for today’s recipe. I guess if I’m really honest, making your own refried beans is not going to be your saving grace if the debt collectors come to call; it will save you maybe $2.95, and the heat your crockpot is going to generate in your kitchen will probably cause the a/c to kick in a little more often than usual, so when it’s all boiled down, you might actually pay more to make refried beans at home than buying a can at the grocery store. I’m realizing that I should probably ditch the economical argument for these beans right about now, but I won’t give up on this recipe yet. I still have the health angle going for me.

This pot of beans has no fat and tons of flavor, a perfect match to the homemade salsa you made yesterday (which I am absolutely certain that you made; probably a double batch, you over-achiever, you). Seriously, I’ve had the beans in a can and what I’m proposing below will completely annihilate anything you buy at the grocery store. And just think, by surpassing the ground beef in your tacos tonight and replacing it with these homemade, healthy, delicious refried beans, you’re saving another cow. Well done.

Crockpot Refried Beans

½ c. onion, finely chopped
1 ½ c. dry pinto beans, rinsed
½ fresh jalapeno pepper, seeded and chopped (Don’t worry if you’re not a fan of spicy. These beans don’t have any kick to them. The jalapeno just adds a nice flavor.)
2 garlic cloves, minced
2 tsp. salt
1 tsp. pepper
¼ tsp. cumin
4 ½ c. water
Shredded Cheddar Jack cheese for serving

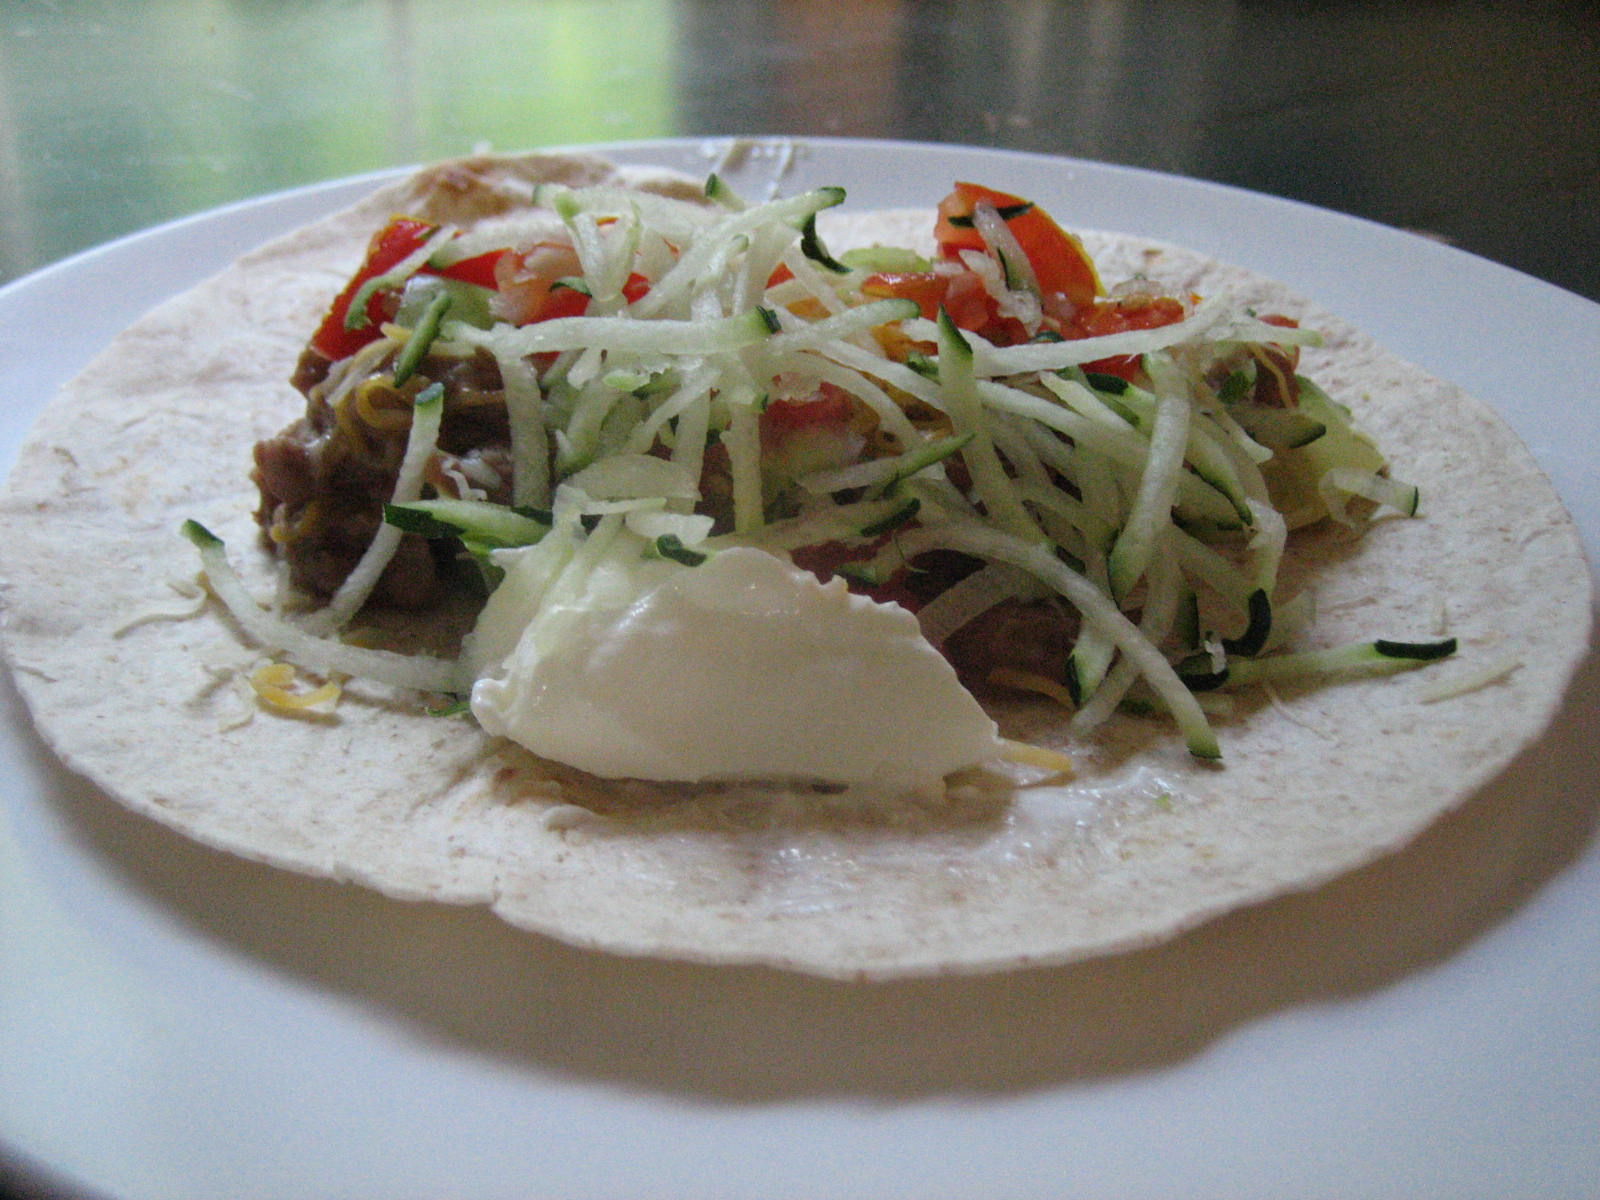
Dump everything in your crockpot, give a quick stir, and cook on high for about 6 hours (I guess it could take longer depending on your slow cooker, but the high heat on mine should be renamed “Hades” because that’s the kind of hellish heat it pumps out) or low for about 10. Strain the beans but be sure to save about 2 cups of the liquid. Mash up the beans, adding bean liquid as you mash, till the beans reach a consistency you’re comfortable with. Top the beans with a thin layer of shredded cheese. Grab your warm tortilla, slather a big spoonful of these beans down the middle, nestle some fresh salsa on top and perhaps, if you're daring, a dollop of sour cream, and dinner is ready. (In the above picture, I also have some shredded zucchini on top. Really, I have this stuff coming out of my ears right now so I pretty much put zucchini on everything that goes in my mouth. But it actually tasted really nice on the tacos so you can always give that a try, too.)

Disclaimer: While I whole-heartedly promote this spectacular recipe, I cannot be held responsible for the gastro-intestinal issues it may induce later on in the evening, so I wouldn’t suggest making this for an anniversary or Valentine’s Day dinner. Probably want to stick with pasta on those nights. Otherwise, enjoy!

Wednesday, July 7, 2010

The Zucchini Challenge Winners- Part 2

The winner of the “savory” category of the Zucchini Challenge was up against some very tough competition. If you are looking for a good zucchini recipe, check out the comments from the intial Zucchini Challenge post because there are loads of great recipes there.

But I chose today’s winner because, frankly, the oppressive summer heat has put me in a semi-bad mood, and I’m kind of fed up with standing next to a scorching hot stove for hours on end trying to make use of this zucchini influx. So I present to you a beautiful, tasty, healthy and “minimal cooking required” recipe that almost makes the 100 degree temp outside bearable…

Zucchini Boats submitted by Kim and Caitlin!!!

A great big thank you to Kim, and her wonderful daughter Caitlin, for bringing this recipe into my world. It took me no more than 25 minutes to prep and cook this recipe. Granted, my zucchini aren’t as cute and petite as the traditional zucchini folks are finding at the markets and groceries these days. Most of my girls are a little thick around the middle and freakishly long, so they would make something more akin to zucchini cruise liners than zucchini boats, but thankfully my husband was able to scavenge a couple reasonably sized zucchini from the garden for this recipe.

Chances are your zucchini are still quite a bit smaller than what I had to work with, so I haven’t put any amounts next to the ingredients in this recipe. Just mix up however much of each item you think you need to fill the zucchini you’re working with.

Zucchini Boats

Kalamata olives
Chopped tomatoes
Crumbled feta cheese
1 clove of garlic, minced
Dash of salt
Fresh basil, chopped
Zucchini, halved lengthwise and center seeds scraped out
Olive oil

Preheat oven to 400 degrees. Simply mix together the first 6 ingredients in a bowl. Fill zucchini with mixture, place in a baking dish, drizzle with olive oil, and bake until zucchini begin to soften; mine took about 15 minutes.

My brother-in-law Ben had the brilliant idea of adding a dollop of hummus on top of his, which sounds amazing but I didn’t actually try it because I had already devoured my “boat” by the time he made the suggestion. But he seemed to be enjoying himself so I highly recommend you giving it a try.

I just want to again thank all of you for your suggestions and encouragement throughout The Zucchini Challenge, and a special thanks and congrats to Sara and Kim for their great recipes!!! Till tomorrow…

Sunday, June 27, 2010

Manic Monday takes a Serious Turn

First of all, I want to send out a big thank you to everyone who took the time to pass along your lunch ideas on Friday’s post. I can’t wait to put these to use this week. And for any of you who didn’t have a chance to join the discussion, go ahead and pop on over to Friday’s post for some great recipe ideas to take the monotony out of your lunch bag.

Alright, on to today’s post. But first, a warning. This post may be a bit of a “Debbie Downer”, but I figure Monday’s are always a little depressing so I’m not in danger of really spoiling anything, and I promise you that the recipe at the end of all this will redeem today’s subject matter.

Browsing through Borders last week, I happened upon a book titled Skinny Bitch. Okay, I know that on principle I should have never picked up a weight loss book written by models, who actually earn a paycheck by being thin (I’d love that kind of motivation), but we had an hour to kill before our movie started so I took the bait and started carelessly leafing through the pages.

The authors of the book are vegans and one way they attempt to recruit readers into their ranks is by discussing the subject of animal cruelty in slaughterhouses. If this topic is at all of interest to you, I suggest picking up their book and taking a look, but I caution you that I wouldn’t do it if you prefer to eat meat with a guilt-free conscience. What I briefly read in their book both shocked and disgusted me to the point that I’ve barely touched meat over the past week, and I’m contemplating how to cut more meat out of my family’s diet.

On that premise (and with all that nasty seriousness safely behind us), I present to you today’s Manic Monday recipe. And although it’s vegetarian, it's hearty and filling enough to satisfy the appetite of my dad, and believe me, that’s saying something; this is a man who has been known to polish off a 9x13 pan of enchiladas in one sitting.


In the above picture, the black bean cake is pictured with salsa and sour cream, but right now I’m envisioning them atop a Kaiser roll with all the traditional burger fixins. The variations are innumerable. Let your imagination run wild.

Black Bean Cakes

2, 15 oz. cans black beans, drained (or you could take the Laura Ingall’s route and soak a pound of dry black beans overnight and then cook them till their tender. But really, that’s uncalled for on a Monday.)
3 green onions, finely chopped
½ c. red bell pepper, seeded and finely chopped
¼ c. fresh cilantro, finely chopped
2 garlic cloves, minced
1 jalapeno chili, minced (This is totally optional. If heat isn’t your thing, just leave it out.)
2 tsp. ground cumin
1 tsp. salt
1 large egg, beaten
2 tablespoons plus ½ c. yellow cornmeal
Olive oil for frying

Put beans in a large mixing bowl and mash them up. Add green onions, pepper, cilantro, garlic, jalapeno, cumin, and salt. Mix in egg and 2 tbsp. corn meal.

Put ½ c. extra cornmeal in a small bowl. Divide black bean mixture evenly into 8 balls. Drop balls in extra cornmeal and coat. Flatten balls into disks. Heat ¼ inch of olive oil in large pan over medium heat. Fry cakes till firm and crisp, about 5 minutes per side. Drain on paper towels and serve however you desire.

Let me now put all your carnivorous fears to rest. I will still be passing along plenty of meaty recipes for those of you who go all sweaty and nervous at the mere mention of the word “vegetarian”. But I figure the occasional meatless meal can’t do any of us harm, and it buys Bessie an extra day on the farm so it’s a win/win for everyone!

Wednesday, June 23, 2010

A Lesson in Cedar Plank Safety

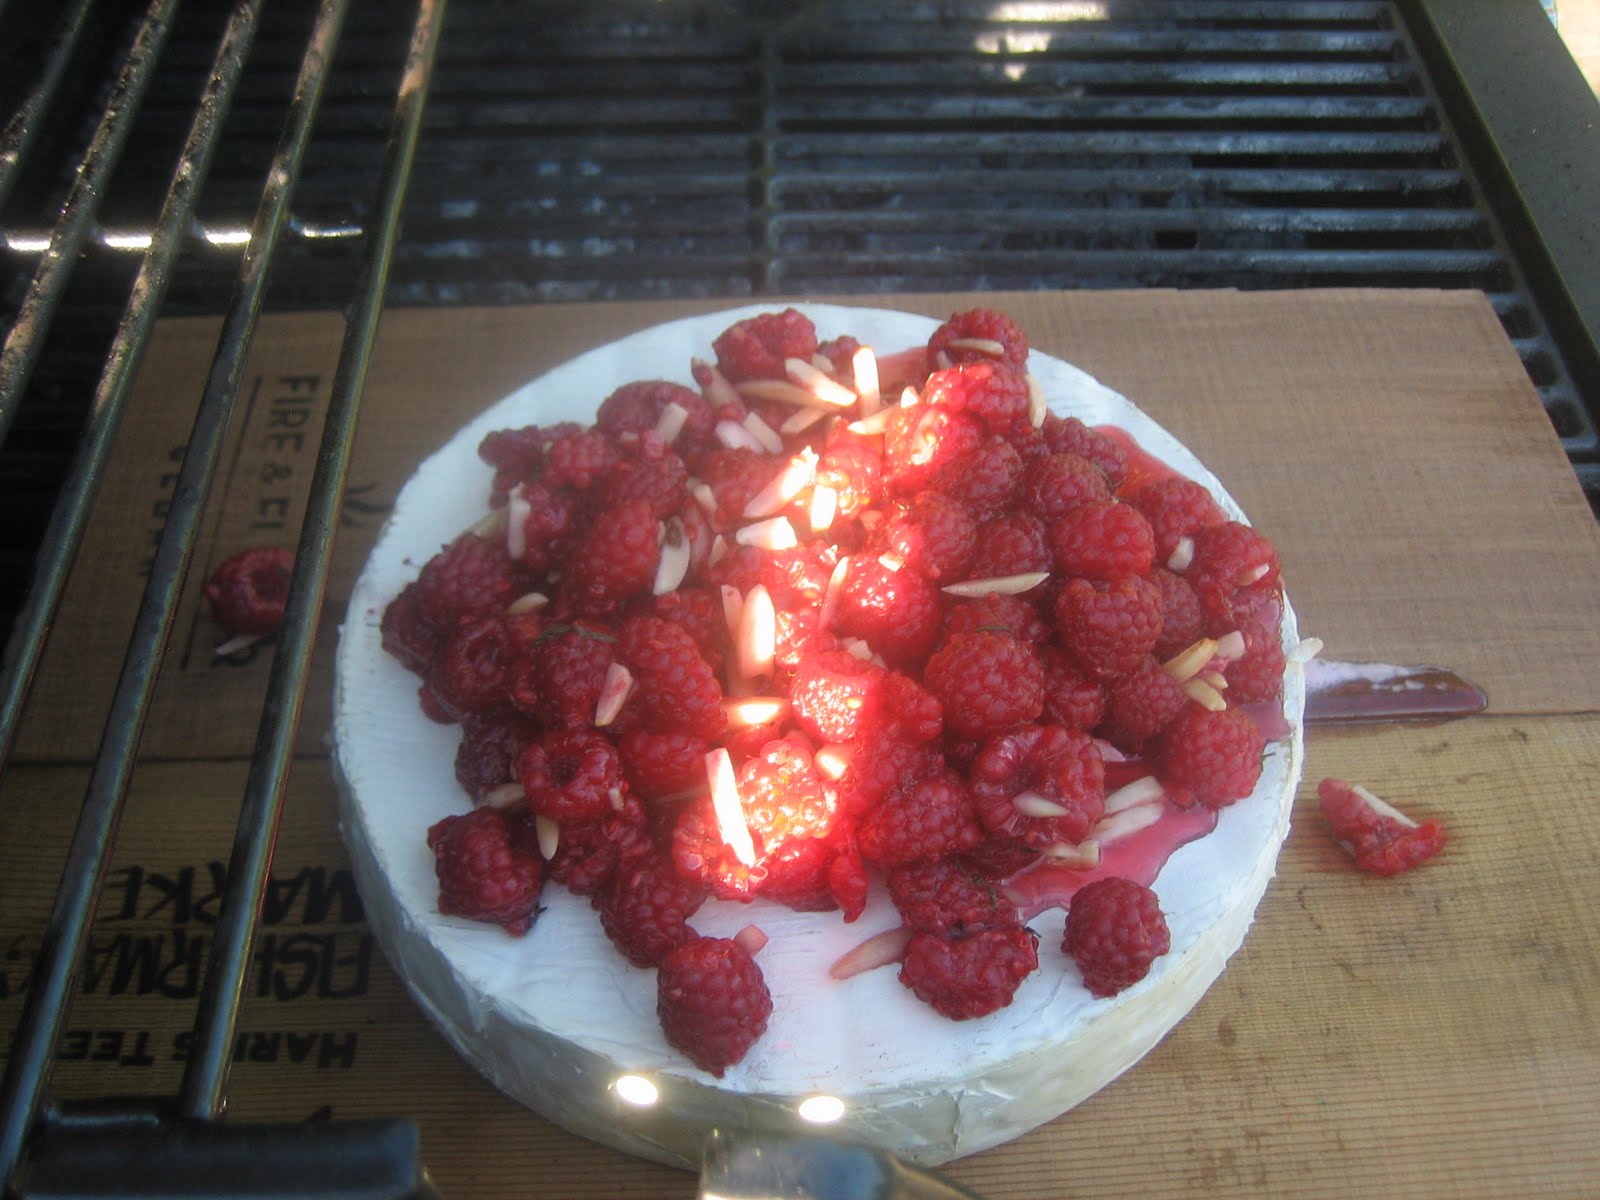
I love cheese. I especially love brie. And I absolutely adore baked brie with pecans and brown sugar. But that combination just doesn’t scream “summertime”, and I needed an elegant, summery appetizer to take to dinner at a friend’s house. Then I remembered this recipe I had tucked away since last summer when I had cut it out of a magazine: Grilled Brie with Raspberries and Almonds. Perfect!

Now, if you have never grilled with cedar planks before, please read the rest of this entry very, very carefully.

You must, I repeat, MUST soak your cedar planks for several hours (let’s just say 4 hours to be safe) before using them to grill. And then you must use them immediately. Do not take them out of the water at 5pm, set them in a hot car for two hours while dropping off your children at your in-laws and chatting it up with other dinner guests at the party, and then whisk them out and assume to use them without them catching fire. This will not happen; they will most assuredly catch fire, and attempt to consume in flame and char everything placed upon them.

The beauty of this story, and this recipe, is that the cheese survived. Yes, I committed the aforementioned transgressions with a rather expensive wheel of brie, and all the accoutrements listed below, and although the cheese looked rather frightful after my husband so bravely rescued it from the flame, it still tasted divine. So even if you don’t heed my advice about the cedar planks, I feel confident you will still succeed and have a lovely, smoky-flavored appetizer to serve your guests. It won’t look like much, but it will taste divine.

Grilled Brie

1 large wheel of Brie, or two small ones
2 pints fresh raspberries
3 tbsp. honey
½ c. slivered almonds (Or whatever nut you fancy. I’m may be a stickler on syrup and parm, but I’m wide open when it comes to nuts.)
Crackers or French bread for serving
1 cedar plank, soaked for a very, very, very long time.

As long as your cedar plank is soaking wet, the rest is a cinch. Put your brie on the plank, add the toppings, plop on a medium heat grill and let cook until the cheese gets nice and gooey, about 15 minutes, or until huge flames lick up from under the grill lid and your head is nearly engulfed in hell fire when you go to check on your once beautifully adorned brie. Either way, the cheese is done and ready to be slathered on crackers and enjoyed, but only after all burns and singes have been properly treated.

No seriously, it wasn’t that bad. Please don’t be afraid of this recipe because it is really really good. Give it a go.

Monday, June 21, 2010

Confessions of a Label-Reader

I have a confession to make: I’m a label-reading junkie. When I go to the grocery, I read the label of every single item that goes into my cart. I’m not kidding. Every. Single. Item. I guess all this high-fructose corn syrup and hydrogenated oil talk has gotten to me a little bit.

But it costs money to eat “healthy”, and since I don’t work, my husband is a writer, and we have 4 children, money isn’t currently raining down in torrents at our house.

All that said, I am still a firm believer that you can feed your family healthy, natural foods without prematurely dipping into your 401k. It requires two things: a good recipe and your time. Not lots of time, but more time than it takes you to tip a box of Rice a Roni into a pot of boiling water. (Just take a look at the ingredient list on a box of Rice a Roni; it’s not pretty. My rule of thumb is “If I can’t pronounce it, I shouldn’t be eating it”. That pretty much rules out most things that come in a box.)

So for today’s Manic Monday, I will provide you with one of the requirements that I mentioned before: a good recipe. You need to provide the time, in this case, about 30 minutes from start to finish.

Keep in mind, this recipe is flexible. Feel free to add whatever veggies you have in the crisper drawer. You’re an adult; I trust you to make good decisions here.

Rice a Veggies (Okay, I need a new name for this recipe. Suggestions? “Max and Ruby” playing in the background while I’m writing this has completely zapped me of all creativity.)

1 can of chicken or vegetable broth
1 c. of long-grain rice
2 tbsp. butter
½ c. onion, finely chopped
1 garlic clove, minced
8 oz. fresh mushrooms, sliced
1 small zucchini, cut into matchsticks
1 medium carrot, cut into matchsticks
1 lb. thin asparagus, cut into thirds
2 tbsp. fresh basil
½ c. Parmesan cheese, grated (see my note from last Monday about Parm. No exceptions.)

Bring broth and rice to a boil in a medium saucepan. Cover the pot, turn heat to low, and cook for 15 minutes, till rice is tender. While your rice is cooking, in a large pan sauté onion and garlic in butter, then add mushrooms, zucchini, and carrots. Cook for about 5 minutes, then add asparagus. Continue to cook another 5-8 minutes, till veggies reach a tenderness you like. By this time, your rice should be ready, so add it to the veggies, stir in basil and parm, add salt and pepper as needed, and you’re done.

Let me give you some serving options here. You could dish this up as a side with chicken or fish if you like, or make it into a one-pot wonder by adding some diced, cooked chicken to the ensemble in your pan, or double it (if you have a family of six like me) and do a vegetarian dinner. All delicious and doable in less than 30.

And join me tomorrow as I reminisce about childhood and Cool Whip, and give you a quick new recipe that makes Cool Whip not-so-cool.

Wednesday, June 16, 2010

Pimento Cheese: The Wild-card Wednesday Debut

Pimento Cheese. What do you think of when you read those two words? This phrase, and food, was introduced to me by a wacky co-worker of mine, Hadden, when we lived in Florida, back in my garlic-naïve days (turns out, they were actually pimento cheese-naïve days as well). Hadden claimed that he had the absolute best recipe for pimento cheese and threatened day after day to bring it into work for me to try it.

Now, Hadden was kind of a crazy, good ole’ boy so I thought maybe he was just making it up because I had no idea on God’s green earth what he was talking about. I thought I knew what pimentos were and I certainly knew what cheese was, but I had no idea how those two things were supposed to make one life-altering dish like he was describing.

Well, Hadden eventually brought in his famous pimento cheese. For those of you who don’t know much about pimento cheese, well, it’s basically a Southern dish of cheddar cheese, mayo, and pimentos. So as Hadden watched me with a wild sort of look in his eye as I bit into his world-famous pimento cheese sandwich, frankly, I was underwhelmed by the whole experience. I just couldn’t see what all the pimento cheese hype was about…until this recipe came along.

I found this treasure in a Paula Dean magazine a couple years ago and tweaked it to my liking and, wow, now I’m a believer. As you read the list of ingredients, you may get a little skeptical, especially if you’re new to pimento cheese like I was. But this little combination is magical; slathered between two pieces of sourdough and grilled, well, it’s downright amazing. Take a chance on this, and I think you’ll be a convert as well.

Grilled Pimento Cheese Sandwiches

¾ c. canned diced tomatoes with chilies

½ c. mayo

½ tsp. Worcestershire sauce

¼ tsp. garlic salt

1/4 c. jarred pimentos, chopped

8 oz. sharp cheddar cheese, shredded (I strongly suggest you get the whole block of cheese and shred it yourself instead of trying to cheat with the pre-shredded stuff. I hate shredding too, but I’m a firm believer that it builds character… and I think it tastes better.)

1 c. pecans, chopped (You could go ahead and toast these as well and add a little more nutty depth to the dish, or not. Depends upon the amount of sanity you still have remaining at this point in the day.)

¼ c. green onion, chopped

Butter

Sourdough Bread, sliced

Stir the first four ingredients together in a large bowl, then add the pimentos, cheese, pecans, and onions; mix well. In grilled cheese fashion, butter bread and sandwich Pimento Cheese in the middle, grilling on each side till golden brown and cheese is melted. Then put on a video for the kids, quietly escape back to the kitchen, and enjoy this tasty little number in the peace and quiet. And then go ahead and throw another on the griddle because one just won’t be enough. I promise.

Monday, June 14, 2010

Manic Monday Begins

I love food and I love cooking. So I decided to start this blog to legitimize my hours of flipping through cookbooks and magazine, scouring for recipes, and cooking in the kitchen, ignoring the constant cries and requests of my four children. So please join me for the first of what I hope will be many Manic Mondays for Mai time in the Kitchen.

If you are a stay-at-home mom like me, Mondays usually mean that laundry is at a critical level (your husband has no clean undies and the kids are sweating in their Christmas polar bear pj’s in the dead of summer), the refrigerator is barren (perhaps some wilted lettuce and pickles remain), and the alleviation of the mess around your house will require no less than a forklift and possibly, if you’re in a really bad mood, a blow torch. At this point, the inhabitants of your home are lucky if they even get fed on a Monday night, and if they do, it’s probably a bowl of gruel. But here’s an alternative: on Mondays, while you’re frazzled and short-tempered, I will have a quick little dinner recipe, tasty yet simple, packaged right here, waiting to be used by you.

Our first Manic Monday recipe is actually a bit of a shout-out to my dear friends Sara and Jill who came to visit me a few weeks ago and really cattle-prodded me into getting this blog started. While they were here I made them a Spinach Fettuccine that they simply adored and I’m hoping you will, too. This recipe is as simple and quick as it gets.

Spinach Fettuccine with Garlic and Olive Oil

12 oz. spinach fettuccine (depending on your grocery store, this may be a little tricky to locate. At my store, it’s in the gourmet/organic section. If the gods are smiling on you that day, you may even find some fresh pasta in the refrigerator section.)

6 tbsp. extra-virgin olive oil

1 c. chopped fresh basil, divided (you must, must, must use fresh basil here or you’re missing the point of this whole recipe.)

4 garlic cloves, minced (tune in here tomorrow for a brief look into the evolution of my cooking career-garlic cloves play a monumental role in getting me where I am today)

½ tsp. dried crushed red pepper (now this is absolutely optional- we are spice-aholics in our family so we like heat in just about everything but please feel free to leave this out…or add more!)

½ c. dry white wine (if you’ve never cooked with wine before and are wondering if your “good parent” status is in jeopardy by serving this meal to your children, relax. The alcohol will cook off before the sauce even touches the lips of your babes. And did you know that you can freeze your leftover wine to cook with later? I saw this on Nigella Lawson’s show one time so I assume it works. )

1 ½ c. parmesan cheese, grated (do not, under any circumstances, use that weird parmesan cheese that is pre-grated in the green bottle for this. I’m not even sure that is cheese, let alone parm. Please, get the real stuff.)

Cook the fettuccine according to the package directions, but when you’re draining it, you might want to hold onto a ½ c. or so of the pasta water just in case you need to loosen up your sauce a bit. Put the fettuccine on stand-by while you make the sauce.

Heat the olive oil in large skillet over medium-high heat. I’d only let the oil heat for a minute or so because if it gets too hot, it will scorch your garlic, and believe me, that’s not a good thing. Add ½ c. basil, garlic, and crushed red pepper; stir 1 minute. Add wine and boil for about 3 minutes. Add mixture from skillet, remaining ½ c. basil, and ¾ c. cheese to pasta. Toss it all together. If it seems a little dry, add some of your reserved pasta water. Pour it into a big bowl, sprinkle a little extra cheese on top, and dinner is done.

The first couple times I served this to my family, everyone, including the kids, ate it with delight. Of course, when Sara and Jill came to visit, I told them that my kids loved this dish, and to prove that point, I offered it to them for lunch. Of course, my son did not perform up to scratch and refused to eat it, but my daughter devoured everything on her plate. With that full disclosure, I will say that I think your kids will love this recipe, as long as you don’t have any friends around that you are trying to impress.

And tomorrow, the much anticipated story of Maile and the Garlic Clove.