Showing posts with label dessert. Show all posts

Monday, January 9, 2012

An Overgrown Cookie, Delighting the Child in Us


This past Christmas, Lucy and I had the privilege of spending a few days in NYC enjoying the sight and sounds of a city during the holidays. One of the stops on our self-guided tour was FAO Schwarz. I remember visiting this overgrown toystore when I was a child and walking around, eyes like grapefruits, taking in the vast selection of toys and candy, more loot than I could ever imagine owning in a lifetime.

Funny enough, I found myself walking around with the same amazement this Christmas at 33 years of age. At one point, Lucy and I took a tucked away elevator down to the lower level. Walls enclosed the moving staircase on both sides, until, in one grand reveal, the walls ended to showcase a candy store of monstrous proportions.

And I mean that.

As I browsed around, mouth gaping open, I discovered Twizzlers the length of my legs, Reese Cups the size of my daughter’s face, and a box of Nerds with similar dimensions of my suitcase; I felt I was snooping around in the BFG’s pantry. Yet as ridiculous as the sizes were, the child in me loved it.

It’s that same child-like sparkle that comes into the eye of my guests, adults and children alike, whenever I serve my cookie pizza. There’s nothing magical about the cookie itself, but I think we like the idea of oversized food, even if we eat only a small wedge of it. It's something of our imagination come to life, a small wonder in an everyday, grown-up world.

Mai’s Cookie Pizza (I wish I had a picture of the full cookie to show you, but somehow everytime I make this, it gets divided up and devoured before I ever fetch my camera.)

6 tbsp. butter, softened
¾ c. brown sugar
1 egg
1 tsp. vanilla
1 ½ c. flour
½ tsp. baking soda
½ tsp. salt
2 c. chocolate chips

Preheat oven to 350 degrees.

In a large bowl, beat butter and brown sugar till fluffy. Add egg and vanilla and beat well. In a separate bowl, combine flour, baking soda, and salt. Add flour mixture to butter mixture and mix well. Stir in chocolate chips.

Dump dough onto standard 12-inch round baking pan lined with foil. Press dough evenly into a 10 ½ inch circle (leaving about an inch and a half border). Bake for 15-18 minutes, or until cookie is a light golden brown. Cut into wedges and serve.

Friday, December 30, 2011

A New Year's Eve Must: The Over 21 Cookie


Last week, in the floury whirlwind that was my Christmas Eve, I added a new cookie to my list of favorites, one I think will make a delightful addition to your New Year's Eve menu. The 1/2 cup of Kahlua qualifies its name, and the addition of espresso might have you second guessing whether you want to share this delicacy with your 3-year old, hence you could also call it "The Adults Only Cookie".

I actually found the recipe in this year's August edition of "Southern Living" and never got around to testing it out till this past week. While I have the habit of fidgeting with most recipes, I followed this one step by step and loved the results; I wouldn't change a thing, therefore, I've provided the link to the recipe here for your convenience.

However, I have two quick notes to add:
1. For all you liquor novices out there whose pantry doesn't include a big bottle of Kahlua, 2 of those little bottles they display at the checkout at your local liquor store will suffice for the 1/2 c. required in the recipe.
2. Be sure to use dark chocolate on top of the cookies; the flavor is far more sophisticated and I'm afraid you'll miss the total effect if you go with milk chocolate.
3. This is an egg-free recipe for any egg allergies out there so here's a late Christmas present to you--enjoy!

If you are looking for a last minute appetizer idea for the big hoorah, tune in tomorrow for a delicious recipe that will take 10 minutes or less to prepare. Happy Baking!

Saturday, December 24, 2011

The Final Day of the Cookie Countdown: The Love Biscuit's Predecessor


Merry Christmas Eve, my friends!

Today I present to you the final recipe of our cookie countdown. This one comes to you without much fanfare because, simply, I have hundreds of cookies to make today and I have no time for chit chat. We're getting right down to business.

This recipe hails from one of my favorite baking cookbooks, The Great American Bake Sale. Actually, before The Love Biscuit (day 11's recipe) entered our lives, this cookie claimed the heart of my husband. So if you're looking for one last addition to your dessert tray for tomorrow's get-together, look no further.

Honey-Roasted Peanut Butter Cookies

1/2 c. butter, softened
1/2 c. firmly packed light brown sugar
1/2 c. granulated sugar
1/2 c. chunky peanut butter
1 egg, beaten
1 1/2 c. all purpose flour
1 tsp. baking soda
1 c. honey-roasted peanuts, coarsely chopped

Preheat oven to 350 degrees.

Cream butter, sugars and peanut butter until light and fluffy. Beat in egg, flour, and soda to make a smooth dough. Mix in peanuts. Shape dough into 1-inch balls and place 2 inches apart on ungreased baking sheets. Press the back of a fork into each cookie in two directions to make a cross hatched pattern. Bake 8 to 10 minutes until edges are lightly browned. Cool 10 minutes, then lift cookies with spatula and transfer to racks. Make 5 dozen.

Wishing you all the wonder and peace that this season promises--Have a very Merry Christmas!

Friday, December 23, 2011

Day 2 of the Cookie Countdown: The Cookie that Stole My Heart


When Shawn and I lived in England 6 years ago, our brother-in-law (a Brit himself) introduced us to a sweet little bakery called Ben's Cookies. As many of you know, cookies hold a very special place in my heart, and therefore, I tend to be a bit of a cookie snob. I hold high standards for the cookies I eat, and for this very reason, I rarely buy cookies from a store--I'm a made-from-scratch cookie consumer.

Then Ben's Cookies entered my life- wait, let me rephrase that. Then Ben's Triple Chocolate Chunk Cookie entered my life. There are not words, my friends, to describe this cookie. It is simply an experience meant to be enjoyed by each and every one of your five senses.

Unfortunately, this is not the recipe I am giving you today; one day perhaps, I will have that beauty in my clutches, but not today.

Instead, I give you one of my own triple chocolate recipes that is reminiscent of Ben's masterpiece. My husband seems to think it is a masterpiece in and of itself, and since he's almost as picky as I am about cookies, I hold that as the highest of compliments. So for the chocolate lovers on your Christmas list, seal up a bag of these and consider your shopping done.

Mai's Triple Chocolate Cookies
1 c. salted butter, softened
1/2 c. white sugar
1/2 c. brown sugar
1/2 c. dark brown sugar
2 eggs
1 tsp. vanilla
2 1/2 c. all-purpose flour
1/2 c. unsweetened cocoa
1 tsp. baking soda
1 tsp. salt
2 c. mixture of milk, dark, and white chocolate chunks

Preheat oven to 350 degrees and line baking sheets with parchment paper.

In a large mixing bowl, combine butter and sugars; mix until light and fluffy. Add eggs one at a time. Then add vanilla. In a separate bowl combine flour, cocoa, baking soda, and salt. Add flour mixture to butter mixture and mix to combine. Stir in 2 cups of chocolate.

Drop dough by tablespoonfuls onto lined baking sheets. Bake for 10-12 minutes, or until cookies no longer look doughy. Remove to cooling rack. Makes 2-3 dozen.

Thursday, December 22, 2011

Cookie Countdown Day 3: Mimi's Wedding Cookies

Looking back to my childhood, I would have never labeled my grandma as a “baker”. Yes, the woman could make a mean Coconut Snowball Cake, but her gifting laid more in the arena of fried chicken and gravy. My grandma was a no-nonsense kind of woman and she stuck to what she knew. What she made, she made well, and while she didn’t often do a lot of baking, one plate of cookies you could certainly count on her bringing to Christmas dinner was her Wedding Cookies.

If you don’t know them by name, I’m sure you know them by sight (my sister-in-law refers to them as “the little white bally thingies”). But whatever you call them, the consensus usually is that if you like butter, sugar, and nuts, you’ll love these. So today I give to you my dear old Mimi’s recipe. Enjoy!


Mimi’s Wedding Cookies


1 c. butter


½ c. powdered sugar


2 c. flour


¾ c. pecans


1 tsp. vanilla


½ tsp. salt


Additional powdered sugar to roll baked cookies in


Mix ingredients together and chill for 15 minutes. Roll dough into 1-inch balls and place on baking sheet lined with parchment paper. Bake at 350 degrees for 10-12 min, or just until cookies are beginning to brown. Remove from tray to cool briefly. When cool enough to handle, roll in powdered sugar, then cool completely, and reroll in powdered sugar.

Wednesday, December 21, 2011

Cookie Countdown Day 4: Christmas in a Cookie

Today's recipe comes from one of my favorite cookbooks, Feast, by Nigella Lawson. Please forgive this slight tangent, but if you don't own any of her cookbooks, I highly recommend putting a bug in your nearest and dearest's ear to get one for you this Christmas. Above all else, her cookbooks are always a good read in and of themselves because the woman can not only cook, she can write. And her recipes are so tangible, built for the common cook like you and I, easy but full of flavor.

Now, on to the good stuff. I initially made this recipe (whose link is provided below) a few years ago, and the first bite I took of the finished result I heard Christmas carols singing and saw snowing falling all around me. This cookie is Christmas in an edible 3-inch diameter.

I love what Miss Lawson did by starting with the basic idea of an oatmeal raisin cookie and then deepening the concept by adding chopped pecans, white chocolate, and exchanging the raisins for dried cranberries. The end result is both delectable and gorgeous.

Miss Lawson, a many thanks for allowing us to add your Cranberry and White Chocolate Cookies to our dessert array this year. Happy Baking, Friends!

Tuesday, December 20, 2011

Day 5 of the Countdown: The Great Pumpkin Cookie

Forgive me for tooting my own horn again, but once more I must pull a recipe from the archives to add to this countdown. I’m not sure the first time around everyone took me seriously when I waxed poetic about this recipe, so this is my second and final attempt.

Just kidding…I’ll never give up, my friends, never.


The recipe I speak of is The Great Pumpkin Cookie. It’s got the simplicity of a drop cookie with the decadence of an iced beauty. I love the warm flavors of cinnamon, nutmeg, and allspice, especially as the weather chills and snowflakes begin gathering on the windowpanes.


And it’s a great contrast to the traditional cookie platter residents: iced sugar cookies, peanut butter blossoms, homemade fudge, and chocolate chip cookies. It changes things up, keeps people on their toes.


Oh, and as a bonus, it's knock-your-socks-off delicious.


Great Pumpkin Cookies

Cookies:
1 c. butter, softened
½ c. white sugar
½ c. packed brown sugar
1 c. canned or fresh pumpkin (if you’re using fresh, make sure you squeeze out as much moisture from it as possible before adding to the batter)
1 egg
1 tsp. vanilla
2 c. flour
1 tsp. baking soda
1 tsp. baking powder
2 tsp. pumpkin pie spice
¼ tsp. salt
¾ c. chopped walnuts (optional)

Penuche Glaze:
3 tbsp. butter
½ c. packed dark brown sugar
¼ c. milk
½ to 2 c. powdered sugar

Preheat the oven to 350 degrees.

For the cookies, cream butter and sugars until light and fluffy. Blend in pumpkin, egg, and vanilla. Mix in flour, soda, baking powder, pumpkin pie spice, salt, and nuts. Drop by tablespoonfuls 3-inches apart on ungreased baking sheets. Bake 10-12 minutes until golden around the edges. Lift warm cookies from baking sheet with spatula, and transfer to racks. Cool about 30 minutes, then spread with glaze.

For the glaze, heat butter and brown sugar in medium saucepan until bubbly. Cook, stirring constantly, for 1 minute until slightly thickened. Beat in milk. Blend in enough powdered sugar to make glaze a smooth, spreadable consistency.


Monday, December 19, 2011

Day 6 of the Cookie Countdown: Disconcerting Lemon Shortbread

My friend Carrie is what I would call a daring cook. I look at a recipe and scoff at the strange combination of flavors; she scans the same list of ingredients, pulls out her pots and pans, and gets cooking. I want to know it’s all going to work out okay; she’s willing to take the risk that it won’t for that slight possibility that it just might be the most amazing dish she’s ever tasted. She sees the diamond in the rough; I see a waste of time.

Though I would love to be more adventurous in my cooking exploits, the benefit of having a friend like Carrie is that I get to taste the fruit of her experiments. Today’s recipe is one of them. When she told me about the recipe, I shrugged it off: “That’s not the kind of flavors I could get excited about,” I told myself.

And then she served this shortbread at her house one day and I couldn’t hold a single coherent conversation with anyone the rest of the afternoon because my mind kept wandering to the lemony, buttery flavor lingering in my mouth after every bite. It was disconcerting, but in a really good way.

The recipe, from Fine Cooking, is Lemon Cornmeal Shortbread. Sounds simple, right? Kind of unexciting, right? Wrong. Oh, so very wrong, my friends. I simply urge you now to go to this link and open your cupboard doors because shortbread needs to be on your menu tonight!

Sunday, December 18, 2011

Christmas Cookie Countdown Day 7: Shirley's Buckeyes


This is a bittersweet blog for me to write today. The recipe I’m showcasing comes from one of the nearest and dearest women I’ve ever known. As I began sketching out what I wanted to write, I realized that a simple 250 words could do no justice to the imprint this woman had on my life so I won’t even dare to try. Instead, I’ll give you a short history and a short memory, and perhaps leave the rest for another day.

The story goes that when I was about 6 months old, my mom had to have her gallbladder removed. Now back then, getting a gallbladder removed was a fairly major operation. Judging by the rugged scar across my mom’s mid-section, it looks like they pretty much filleted your stomach to get that little bugger out.

After the surgery, my mother couldn’t lift anything (including little ole’ me) for 6 weeks. So while my mom recouped, her best friend, Shirley, took me on as her own. For six weeks I was her little baby girl. And she used to tell me that when my dad came to pick me up on the last day in order to take me back home to my mom, Shirley cried and cried because she couldn’t stand to let me go.

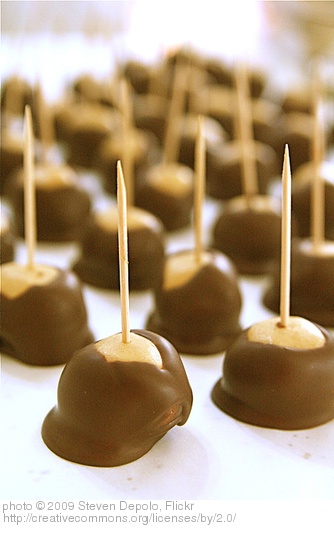
Thankfully Shirley was a constant presence throughout my life, but I remember her most fondly at Christmastime. It was her favorite season, and being an extraordinary baker, it was her chance to really show off. One Christmas in particular, she arrived at our family get-together with a huge round tin, brimming with festively frilled red and green wrappers, each cradling what we Ohioans fondly call the Buckeye. This decadent confection is, simply put, peanut butter fudge rolled into balls and dipped into chocolate. What’s not to love.

I spent nearly every Christmas season of my life enjoying the delights of Shirley’s cooking. Then, in July of 2009, just 2 weeks after I had my baby, Sam, Shirley passed away. His slight little body cuddled me on the solemn flight from Virginia to Ohio for her funeral. He never got to meet her, the only one of my children not to know their “Grandma Shirley”.

Oh, how I miss her…

But she would be so delighted to know that her Buckeye recipe is alive and well and bouncing around cyberspace. Thanks, Shirley, for this recipe.

Shirley’s Buckeyes

1, 18oz. jar of creamy peanut butter
½ c. softened butter
1 lb. box of confectioner’s sugar
1, 12 oz. pkg. semi-sweet chocolate chips
3 tbsp. shortening

Combine the peanut butter and butter. Add sugar and mix well. Roll mixture into balls, stick a toothpick in each one and chill for at least 30 minutes. Meanwhile, melt chocolate chips and shortening in microwave, stopping every 30 minutes to stir chocolate until completely melted.

Working quickly, dip chilled peanut butter balls in melted chocolate being careful not to completely cover the top but allowing a crown of peanut butter to show through on the top, resembling a buckeye. Place dipped balls on waxed paper, remove toothpicks, and refrigerate till ready to serve.

Saturday, December 17, 2011

Day 8 of the Cookie Countdown: A Jungle Jack Christmas


Today’s recipe is for all you health-nuts out there. No, this recipe is not “healthy”; does such a cookie recipe truly exist? But this recipe is healthier than your standard chocolate chip cookie. There are loads of nuts, so you can check protein off your list, and lots of flax, so at least you’ll stay regular.

I actually got this recipe from a Paula Dean magazine a couple years ago. It’s the go-to cookie for Jack Hanna (you know, the animal guy). Supposedly he has a real sweet tooth so his wife made up this recipe to help satisfy his cravings and keep him sleek and handsome in this khaki safari outfits.

But whether nutrition is top on your list of food priorities or lingers a little closer to the bottom, this is a wonderful recipe that you simply must try. Chewy, hearty but not heavy, and the flavors of maple, nuts, and chocolate complimenting each other perfectly, this recipe will not disappoint. Thank you, Suzi Hanna--you made a beauty with this one!

Jungle Jack’s Cookies

1 c. unsalted butter
1c. sugar
1 c. firmly packed brown sugar
¼ c. maple syrup
2 large eggs
1 tbsp. vanilla extract
2 ½ c. organic all-purpose flour
½ c. organic whole-wheat flour
2 tsp. baking soda
1 tsp. salt
1 c. canola oil
1 ½ c. old-fashioned or quick-cooking oats
½ c. 7-grain cereal
½ c. golden flax seed
1 c. finely chopped walnuts
1 c. finely chopped pecans
1 c. finely chopped almonds
2 c. semisweet chocolate chips
2 c. walnut halves

Preheat oven to 350 degrees. Line 2 baking sheets with parchment paper; set aside. In a large bowl, beat butter, sugars, and maple syrup at medium-high speed with an electric mixer until light and fluffy. Add eggs and vanilla, beating until combined.

In a medium bowl, combine flours, baking soda, and salt; sift once. Add flour mixture, alternately with oil, 1 cup at a time, beginning and ending with flour mixture; beat at low speed, until smooth, after each addition. Fold in cereals, flax seed, and chopped nuts.

Drop dough, by rounded tablespoons, gently pressing flat with hands. Sprinkle cookies evenly with chocolate morsels and walnut halves. Bake for 10 to 12 minutes, or until edges are lightly browned. Let cool for 2 minutes on baking sheets. Remove to wire racks to cool completely. Makes about 3 dozen.

Friday, December 16, 2011

Day 9: A Gluten-Free Special

I have just realized that in my past 1 ½ years of blogging, I have already imparted to you some of my most beloved cookie recipes, therefore, you will have to forgive the occasional recipe repeat that may appear on this countdown. Be assured that if a recipe is repeated here, it has happened out of necessity.

Day 9’s inductee into the countdown is really a shout-out to all you gluten-free folks out there. I just want to let everyone know that GF’s still know how to have fun, and this little humdinger proves my point.


This cookie is chocolate on a chocolate high. It’s over the top and that’s why I love it. Sometimes we need to cut loose a little bit, let our hair down and relax. I have really short hair so this is my compromise—I eat one of these.


Many thanks to Bon Appetit for once again splashing life onto my palate by introducing this recipe to me!


Deep Dark Chocolate Cookies


1 1/2 c. bittersweet chocolate chips, divided


3 large egg whites, room temperature (I didn't have mine at room temperature so I just sat them in a bowl on a towel set on the preheating oven and in about 10 minutes they were just right.)


2 1/2 c. powdered sugar, divided


1/2 c. unsweetened cocoa powder


1 tbsp. cornstarch


1/4 tsp. salt


Preheat oven to 400 degrees. Line two baking sheets with parchment paper. You could take a gamble and try to make these just by greasing your baking sheets but I like a sure bet like parchment paper; I'm a play-it-safe kind of girl. Melt 1 cup of chocolate chips in glass bowl in microwave, checking and stirring about every thirty seconds, just until the chips melt and are smooth. Cool slightly.


Using electric mixer, beat whites in large bowl to soft peaks. Gradually beat in 1 c. sugar. Continue beating until mixture resembles soft marshmallow creme. Whisk 1 cup sugar, cocoa, cornstarch, and salt in medium bowl to blend. On low speed, beat dry ingredients into meringue. Stir in lukewarm chocolate and 1/2 cup chocolate chips (dough will become very stiff).


Place 1/2 c. sugar in bowl. Roll 1 rounded tablespoon dough into ball; roll in sugar, coating thickly. Place on prepared sheet. Repeat with remaining dough, spacing 2-inches apart. Bake until puffed and tops crack, about 10 minutes. Cool on sheets on rack 10 minutes. Transfer to rack; cool.

Thursday, December 15, 2011

Day 10 of Cookie Countdown: The New and Improved Gingerbread Man

What holiday cookie platter is complete without the husky build and tentative smile of the gingerbread man? Problem is, his traditional taunt of “catch me if you can” is hardly enticing when he usually tastes no better than a piece of spiced cardboard, hardly the Christmas delicacy he was meant to be.

Until now.


This recipe gives the gingerbread man the makeover he has long been awaiting. The combination of cinnamon and ginger is perfectly balanced, the texture is tender and light. Again, I’ve never been a great fan of gingerbread cookies until this recipe came along. They are perfectly delectable without a hint of icing, but if you, like me, enjoying flexing your artistic muscles by decorating cookies, then whip up a batch of royal icing from Tuesday’s recipe and get creating; the sweetness just adds to the experience.


Mai’s Gingerbread Men


4 c. flour


1 tbsp. cinnamon


1 tsp. ground ginger


1 tsp. salt


1 tsp. baking soda


½ tsp. baking powder


1 c. butter, softened


2 c. dark brown sugar, packed


2 tsp. vanilla


2 large eggs


¼ c. buttermilk


In a separate bowl, combine flour, cinnamon, ginger, salt, baking soda, and baking powder. In a large bowl, beat butter and sugar. Add vanilla and eggs, mix well. Then add buttermilk. Combine dry ingredients with butter mixture and mix just until combined. Divide dough in half and wrap in plastic wrap. Refrigerate for 2 hours or overnight.


Preheat oven to 350 degrees. Line baking sheets with parchment paper. Roll out dough to about ¼ inch thickness and use 5-inch cookie cutters to cut out cookies. Place on lined baking sheets and bake for 10-12 minutes or until edges start to darken. Cool. Decorate with royal icing if you wish.

Wednesday, December 14, 2011

Day 11 in the Cookie Countdown: The Love Biscuit

Today’s recipe is a tribute to my impossibly kind and handsome husband, Shawn. This is his favorite cookie, and coincidentally, it’s my favorite cookie dough to eat. Strange, perhaps, but nevertheless true.

It’s a simple drop cookie; nothing elaborate here, but the taste makes up for its plain appearance. In my eyes, you can never go wrong with a chocolate-peanut butter combo, but in here you have a subtle hint of maple in the background to usher the flavors in.

And the best part is that most of the ingredients (actually all of them) are staples in my kitchen so I can crank out a batch of these cookies at last minute notice. That’s a handy recipe to have in one’s arsenal, especially around this hectic time of year.

Mai’s Oatmeal Cookies aka The Love Biscuit

1 c. vegetable oil

¾ c. brown sugar

¾ c. white sugar

2 extra-large eggs (or 3 medium)

1 tbsp. vanilla

1 tbsp. pure maple syrup

2 ½ c. old-fashioned oats

1 ¾ c. all-purpose flour

1 ½ tsp. salt

1 tsp. baking soda

1 ½ c. peanut butter baking chips

1 c. chocolate chips

Combine oil and sugars. Add eggs and beat well; then add vanilla and maple syrup, mixing to combine. Add oats, flour, salt, and baking soda and mix well. Stir in peanut butter chips and chocolate chips. Refrigerate dough for an hour.

Preheat oven to 350 degrees. Drop tablespoonfuls of dough on parchment paper lined baking sheets. Bake cookies for 10-12 minutes, or until just beginning to brown.

Tuesday, December 13, 2011

The 12 Cookies Of Christmas Countdown

12 days before Christmas. 12 cookies to bake for the pleasure of you and those you love.

I am actually a bit of a cookie connoisseur. Therefore, I assure you that you will not be led astray by any of these recipes because they are my tried and true favorites. I have eaten these cookies in every form: dough, hot from the oven, 3 days old, and they simply don’t disappoint at any stage.

Today’s offering heralds from my earnest desire to eat things that both look beautiful and taste sublime. For me, there is no in-between. Actually, I’d rather eat something that looks sub-par but tastes marvelous than eat something that is gorgeous and tastes like sawdust. But this recipe meets all criteria.

As a child, I loved those little Keebler iced animal crackers with the soft-pink icing. It was back in my “knows not the meaning of moderation” days and I could polish of the whole bag in an average of 2 sittings. But I never could get into the typical iced sugar cookie hoopla. I could pass up plates upon plates of Christmas tree cut-outs slathered in pastel green powder sugar icing.

And then, at the ripe age of 22, I stumbled upon this recipe. It hearkened back to the essence of the Keebler cookies of my youth but were far more sophisticated and evolved; imagine the Keebler elves closing the doors of their tree-trunk abode and moving to Buckingham palace—these cookies are classy.

Most of the recipes from the countdown will be my very own, but this particular one I pulled from a Bon Appetit magazine years ago (December 2000 to be exact). It’s been my go-to cookie-cutter recipe ever since then and now I invite you to add it to your baking line-up.

So here I provide for you the link to these sweet delectables:

Ladies and Gents, I present to you…The Holiday Sugar Cookie with Royal Icing. Enjoy! Link

Thursday, November 17, 2011

Gluten-free Pumpkin Crisp--A New Thanksgiving Tradition


Thanksgiving is fast approaching, my friends, and for you gluten-free folks out there, it can be a bittersweet occasion. You see your family and friends enjoying the fruits of wheat-laden cooking and baking while your plate looks rather bleak minus the bread stuffing, gravy, green bean casserole, homemade dinner rolls, pumpkin pie…I could go on, but I won’t.

Or perhaps you celebrate this holiday with a family of gluten-free believers who have found creative ways to make Thanksgiving dinner with tasty, digestive-friendly alternatives to the traditional fare.

Whichever group you are in, I present to you a splendid, gluten-free pumpkin crisp that will entertain any palate. I will actually go so far as to say that you could forgo the pumpkin pie this year and serve this alone and there would be not a whisper of protest. It’s that good.

Mai’s Gluten-free Pumpkin Crisp

3 c. fresh pumpkin (if you use canned pumpkin, up the evaporated milk to 1 c.)
¾ c. maple sugar (but white sugar works just fine here if that’s all you’ve got on hand)
¾ c. evaporated milk
4 eggs
1 tsp. cinnamon
1 tsp. pumpkin pie spice
1 tsp. vanilla extract

Topping:
¾ c. packed brown sugar
¾ c. gluten-free quick oats
¾ c. chopped walnuts
¼ tsp. cinnamon
6 tbsp. butter, melted

Whipped cream or vanilla ice cream to serve

Preheat oven to 350 degrees.

In a large bowl, combine pumpkin, sugar, milk, eggs, cinnamon, pumpkin pie spice, and vanilla. Mix until smooth and then pour into buttered 8-inch baking dish and bake for 25 minutes.

Meanwhile, make topping by combining brown sugar, oats, walnuts, and cinnamon in a small bowl. Toss ingredients in melted butter. When the pumpkin mixture has baked for 25 minutes, gently top it with crumble mixture and bake pumpkin crisp for an additional 20-25 minutes, or until topping is golden brown.

Serve with sweetened whip cream or vanilla ice cream, and don’t begrudge all the folks who are passing up the gluten-rich desserts to feast on your treat; remember: ‘tis the season for thankfulness.

Wednesday, October 12, 2011

Feeling Sorry for My Gluten-Free Self


A huge “thank you” to everyone out there who responded to my call for help a couple weeks ago when I began this gluten-free adventure that I’m on.

Today, I am sharing with you a specifically “gluten-filled” recipe because, frankly, I’m two weeks into this thing and I’m feeling rather sorry for myself. In the past two weeks, I’ve had to decline my dear friend Jess’s beautifully cheesy baked zita, my mother-in-law’s delicious homemade chicken noodle soup, my mother’s oreo ice-cream cake and 14+ nights of pretzels and cheese (my pre-gluten-free bedtime snack). The list could go on. It actually does go on in my mind, but I’ll have mercy on you.

But in all truthfulness, it hasn’t been nearly as bad as I thought it would be. I feel great, lighter really, and more clear-headed. I sleep like a log whereas before I would struggle to fall asleep and then wake up numerous times throughout the night. I don’t get headaches like a used to. And I don’t get the “after-lunch drowsies”. So really, passing up a piece of ice-cream cake feels like a small sacrifice for how much better I’m feeling.

Still, I miss my cake and cookies and bread and cereal (I’ve definitely had my fill of Corn Chex in the past two weeks). Tonight as Shawn and I sat at the table enjoying our “kids are in bed” snack, my desire for the pretzels he was eating was palpable; he felt frightened and rightly so. But then the moment passed and I was no longer a danger to myself or anyone else.

It’ll get easier.

Therefore, I present to you today one of my favorite fall desserts. Just a heads up: the icing for the cake requires a candy-thermometer and if I were you, I wouldn’t overlook this small detail. I tried to make the icing without one a couple weeks ago and I had more of a brown sugar cement than an icing.

Please, make and enjoy this cake…if only for me.

Fresh Apple Cake

2 cups sugar
1 ½ c. vegetable oil
4 large eggs
1 teaspoon vanilla extract
2 ½ c. flour
2 tsp. baking powder
1 tsp. ground cinnamon
1 tsp. salt
3 c. peeled and chopped apples
Caramel Glaze

Preheat oven to 350 degrees. Grease and flour a 12-cup fluted pan.
In a large bowl, beat sugar and oil at medium speed with an electric mixer until combined. Add eggs, one at a time, beating well after each addition. Beat in vanilla.

In a medium bowl, combine flour, baking powder, cinnamon, and salt; sift. Gradually add to sugar mixture, beating until combined. Stir in apples.

Pour into prepared pan; bake for 1 hour to 1 hour and 10 minutes, or until a wooden pick inserted in center comes out clean. Let cool in pan for 10 minutes. Remove from pan and cool completely on a wire rack. Spoon warm Caramel Glaze over cake.

Caramel Glaze

1 ½ c. firmly packed brown sugar
½ c. butter
3 tsp. milk

In a small saucepan, combine brown sugar, butter, and milk. Bring to a boil over medium-high heat; cook until temperature reaches 234 degrees on a candy thermometer, stirring occasionally.

When I made this recipe a couple weeks ago, I put the batter into a 9x13 and 8x8 inch pans and it worked perfectly. Of course, if you take this route, you need to shorten the baking time, and keep in mind that the finished product won’t be quite as aesthetically pleasing, but believe me, your taste-buds won’t know the difference.

Wednesday, October 13, 2010

The Cookie (it needs no other introduction)

I'm gonna be honest with you all, lately my time in the kitchen has produced some pretty lame results. I tried a lentil soup earlier this week and it was okay, but didn't wow me. Same with the breakfast burritos I made for dinner tonight. I always know I've really created something great when I lean back in my seat after a meal and say, "That's better than a restaurant. Gordon Ramsey eat your heart out."

I haven't said that in a while...

except for this cookie recipe that I made last week for some friends we had over, and forgive my pride, but these chocolate lovelies were from another planet, so delightfully light and chewy and filled to the brim with chocolate that I had a lot of trouble sleeping that night from all the caffeine (I think this legitimizes eating them for breakfast, you know, for the energy boost; it's just like a cup of coffee, right?).

Okay, truthfully though, I didn't make this one up so I've gotta give props to Bon Appetit for printing this in one of their magazines in the past 10 years because I'm not sure which one I ripped it out of during the decade that I've been subscribing. But I do congratulate myself at knowing a great recipe when I see one. I know it's a bit of a stretch, but I'm kind of in a culinary drought at the moment and I'll take what I can get.

Seriously, though, make these cookies. Please, do this for yourself.

And eat the entire batch. Then be prepared for a tremendous caffeine high.

Hey, and for all you gluten-free folks out there, I think this recipe may actually qualify!

Deep Dark Chocolate Cookies

1 1/2 c. bittersweet chocolate chips, divided
3 large egg whites, room temperature (I didn't have mine at room temperature so I just sat them in a bowl on a towel set on the preheating oven and in about 10 minutes they were just right.)
2 1/2 c. powdered sugar, divided
1/2 c. unsweetened cocoa powder
1 tbsp. cornstarch
1/4 tsp. salt

Preheat oven to 400 degrees. Line two baking sheets with parchment paper. You could take a gamble and try to make these just by greasing your baking sheets but I like a sure bet like parchment paper; I'm a play-it-safe kind of girl. Melt 1 cup of chocolate chips in glass bowl in microwave, checking and stirring about every thirty seconds, just until the chips melt and are smooth. Cool slightly.

Using electric mixer, beat whites in large bowl to soft peaks. Gradually beat in 1 c. sugar. Continue beating until mixture resembles soft marshmallow creme. Whisk 1 cup sugar, cocoa, cornstarch, and salt in medium bowl to blend. On low speed, beat dry ingredients into meringue. Stir in lukewarm chocolate and 1/2 cup chocolate chips (dough will become very stiff).

Place 1/2 c. sugar in bowl. Roll 1 rounded tablespoon dough into ball; roll in sugar, coating thickly. Place on prepared sheet. Repeat with remaining dough, spacing 2-inches apart. Bake until puffed and tops crack, about 10 minutes. Cool on sheets on rack 10 minutes. Transfer to rack; cool.

Sunday, October 3, 2010

Lemon Bars for the Lemon-Hater

When I go to a restaurant and the waitress hands me the menu while reciting the daily specials, I have a rude habit of completely tuning her out, flipping to the back of the menu, past the drinks, apps, and mains in a focused search for a complete and detailed list of the restaurant’s dessert offerings. Here's why: I don’t want to stuff myself on steak and fries only to be presented with a dessert menu offering a peanut butter tart that I can’t shoehorn into my stomach no matter how great my desire for it. I refuse to be caught out like that, so I scan the sweets first and foremost, determine whether they are worth saving room for, and then proceed with checking out the rest of the menu.

Now, there was a time in my life when I simply wouldn’t eat a meal without ending with a dessert. In fact, there were times when I would forgo eating a meal so that I could gorge myself on some ridiculously decadent dessert. I like to think I’ve grown up since then; well, at least a little bit. I’ve become pickier about what desserts I will and won’t indulge in. Hence, the list I have compiled below.

1. Cake- I never, ever eat cake at a restaurant. Honestly, I was a self-proclaimed “cake-hater" until my early twenties when my mom’s best friend, Shirley, made the most incredibly life-altering pumpkin layer cake for me (a recipe I will be making during one of the cooking classes I’m teaching this fall; click here for details). Since that time, I like to eat the occasional piece of cake, but chose to forgo it when eating out.
2. Bread pudding of any type-In my mind, that just speaks for itself.
3. Crème Brulee- This one is a true tragedy. I used to LOVE crème brulee. Then I made it for dessert one night when I was pregnant with our first child. It became a casualty of pregnancy-induced nausea, and it still gives me the shivers to this day.
4. Lemon-flavored desserts- Not sure why, but lemon just doesn’t do anything for me in a dessert… or so I thought.

About a month ago I was perusing some recipes that I’d torn out of magazines, looking for something to take to a family get-together, and my sole aim was to find something that I already had all the ingredients for. Well, the only thing that fit into that category was a recipe from Southern Living for Lemon Bars. “Oh, well,” I thought, “At least I won’t be tempted to eat them myself before I make it to the dinner.” How wrong I was.

I actually tried to make lemon bars back when we were first married, but they turned out all oily and crumbly, and I had visions of the same thing happening this time around. But these bars turned out so beautifully neat and delicate, exactly what a lemon bar should always be.

And these babies tasted good, so good that my husband who is a self-proclaimed “lemon-hater” couldn’t keep his grubby little paws away from the cooling bars. “I’m just cleaning up the crusty edges,” he kept saying. “You wouldn’t want to take them to the dinner looking like that.” Truth is, I kept diving in for a nibble as well when he wasn’t looking. I very easily could have eaten the entire pan, and that’s a saying a lot from someone who has always snubbed lemon desserts in the past.

Thank you, Trisha Stevens from Southern Living, for bring these little lovelies into my life!

Lemon Bars

2 ¼ c. flour, divided
½ c. powdered sugar
1 c. cold butter, cut into pieces
4 large eggs
2 c. granulated sugar
1 tsp. lemon zest
1/3 c. fresh lemon juice (Fresh is the key word here. Don’t go getting RealLemon for this recipe. Just take the extra 30 seconds and squeeze a couple lemons yourself.)
½ tsp. baking powder
Powdered sugar for dusting

Preheat oven to 350 degrees. Line bottom and sides of 9x13 inch pan with foil and give yourself some overhang on the sides to lift the bars out when they’re done. Make sure you butter the foil.
Stir together 2 cups of flour and ½ c. powdered sugar. Work the cold butter into the flour mixture till it has a crumbly texture. Press this into the bottom of your pan. Bake the crust for 20-25 minutes or until lightly browned.

While that’s baking, whisk eggs in a large bowl until smooth; whisk in granulated sugar, lemon zest, and lemon juice. Stir together baking powder and remaining ¼ c. flour; whisk into egg mixture. Pour mixture over hot baked crust.

Bake at 350 degrees for 25 minutes or until filling is set. Let cool in pan on wire rack for 30 minutes. Lift from pan using foil sides as handles. Cool completely on wire rack. Remove foil, and cut into bars; sprinkle with powdered sugar.

Seriously, if you’ve been in the habit of baking your lemon bars from a box of Krusteaz mix, well, just be prepared for a serious upgrade to your lemon bar experience thus far, and I give you permission to throw out any those sneaky boxes that may be hiding in your pantry.

Thursday, July 15, 2010

My Dad's Favorite: Blueberry and Peach Pie

If you’ve been reading this blog for any length of time, you know my relationship with homemade pie crusts is somewhat tumultuous. Well, a couple of weeks ago, I was visiting my family in North Carolina and decided, the morning before the family reunion we were supposed to attend, that I would take my dad’s favorite pie, whose recipe is listed below, to the reunion and also make an extra one for him.

Keep in mind, this was a hectic morning. We were staying at my brother’s house and between his family, our family, and my parents, there were 7 kids, 6 frazzled adults, and one dog rushing around the house, not quite the peaceful atmosphere for my pie-making that I’ve recommended in previous blogs.

So in the midst of this mayhem, I was trying to do a half decent job of mixing and rolling out the pie dough. Mind you, my dad was sitting at the island the whole time I was doing this, mentally evaluating my every move. Then the following very short but very charged interchange took place:

“What are you trying to do?” Dad asked. I immediately didn't like where this is going. He’d been sitting there the whole time. I was making the pie for him. Surely he knew what I was doing.

I pressed the dough in my hands into a tighter ball, and through clenched teeth, replied, “I’m making pie crusts.”

Dad paused, got a clever little smirk on his face and replied, “Do you need your mom to show you how to do it.”

Enter the stink eye. In case you aren’t familiar with this term, supposedly it has Hawaiian origins (which is appropriate since my dad is from Hawaii) and it is defined as a facial expression of distrust or dislike. Well, folks, at that moment I delivered the fiercest, most piercing stink eye ever recorded across that island towards my dad, and whispered, through now bared teeth,

“No.”

I admit, the crusts weren’t pretty. There were some gnarly edges that needed a little patching, and the final crimping around the rim had a bit of a rugged look. But it tasted good enough for my dad to eat a whole pie himself, so I guess I did alright. And my relationship with my dad is still intact so I think I’d consider the whole episode a success, though it did get a little hairy there for about thirty seconds
.
Honestly, though, this recipe is divine. But you must, must, must use fresh, in-season blueberries and peaches. We once tried to recreate this pie in the late summer when the only peaches and blueberries that were available got trucked in from California, and it just didn’t work. I mean, it was good, but it wasn’t phenomenal like this pie has the potential to be. So now’s the time to make it, when blueberries and peaches are bursting on the scene at every farmer’s market and roadside stand out there!

Blueberry and Peach Pie

1 ½ c. water
3/4 c. brown sugar
2 tbsp. cornstarch
½ tsp. salt
1 tsp. cinnamon
2 c. fresh blueberries
2 lbs. peaches, peeled and sliced
1, 9-inch deep dish pie crust, unbaked

Topping:
½ c. flour
½ c. brown sugar
¼ tsp. cinnamon
1 c. oatmeal
½ stick butter, cut in pieces


Preheat your oven to 350 degrees. Put blueberries and peaches in a large heatproof mixing bowl. In a saucepan, put your brown sugar, cornstarch, cinnamon, and salt. Give this dry mixture a good stir in your pot so that the cornstarch gets evenly distributed and doesn't clump when you add the water. Then add the water and stir. Turn the heat on high and bring the mixture to a boil. Reduce heat and simmer for a few minutes till mixture gets nice and thick. Pour the syrup over the blueberries and peaches in the mixing bowl. Toss together and cool.


Pour fruit mixture into the unbaked pie crust. In a mixing bowl, put all the topping ingredients together, working the butter into the dry ingredients till it has a crumbly texture. Spread crumbs over top of fruit in the pie shell. Bake in the preheated oven for 1 hour, or until nice and golden brown. Cool pie for at least 10 minutes before cutting.


Note: I highly recommend putting a cookie sheet on the rack underneath the baking pie, otherwise it will probably bubble over and leave a nasty little mess on the bottom of your oven. I always give my mom a hard time when she bakes in my oven and forgets this little courtesy. And then last month, as I was baking this pie in my sister-in-law's oven, I committed the same offense. Thankfully, Suzanne was much more gracious with me than I was with my mother. Sorry, Mom; I promise to be kinder in the future when your apple pie leaves a pile of burning syrup in the bottom of my oven and causes my entire kitchen to fill with acrid smoke and sets off the fire alarm, sending my two youngest children into a nervous frenzy of crying everytime I use the oven for the next month. Okay, I guess I'm a work in progress, but I'm getting there; aren't we all.


Hope you have a great weekend and cook something yummy that will satisfy the hearts and tummies of those you love! See you Monday!!

Monday, July 5, 2010

The Zucchini Challenge Winners- Part 1

I’ve decided that in order to do justice to the two winners of the Zucchini Challenge, I will announce the winners over two days so that I can wax poetic as much as I need about each recipe. Today I present to you the winner of the “sweet” recipe, and the winner is…

Sara with the Chocolate Zucchini Cupcakes Recipe!!!

If the only good thing that comes from these mammoth zucchini trapsing in from my garden is this recipe, I’m more than satisfied. Heck, I’ll add on to the house and build them their own suite if it means my kitchen stays well stocked with these cupcakes. They are so moist and delicious and ridiculously full of chocolate that I didn’t feel compelled to add icing on top; I think it quite possibly could have sullied their perfection. At the risk of sounding over zealous, I declare that these are the best chocolate cupcakes I have ever tasted.

Just do yourself a favor and make these cupcakes today, or at least this week, and feed them to the people you really love, knowing that even though there’s a fair bit of chocolate and sugar in them, there’s also 2 big cups of shredded zucchini hidden inside as well (and I dare say you could up the amount of zucchini from 2 cups and the cupcakes wouldn’t suffer for it; you can’t detect zucchini in the flavor at all, it just adds an incredible moistness).

I confess that I did slightly change the original recipe. Sara’s recipe called for allspice and cinnamon, but I didn’t forsee that going down well with my little ones so I just left them out and upped the amount of vanilla. I also used Hershey’s Special Dark Cocoa instead of standard baking cocoa because I like my chocolate dark. In the future, I think I’ll add various types of chocolate chips rather than just the standard semi-sweet. I’m envisioning something along the lines of ½ c. each of milk, white, and dark chocolate chips, especially if I continue to forgo the icing. Or you could really amp up the glory by adding a mixture of chocolate and peanut butter chips. Wow. I think I need to go whip up another batch.

Chocolate Zucchini Cupcakes

1 1/2 cups brown sugar
1/4 cup melted butter
3/4 cup vegetable oil
3 eggs
2 tsp. vanilla
1/2 cup buttermilk
2 cups grated zucchini
1 cup chocolate chips
2 cups unbleached flour
1 cup Hershey’s Special Dark cocoa, sifted (or use regular if you’re not a dark nut like me)
1/2 tsp salt
2 tsp baking soda

Pre-heat oven to 350 degrees F. Line muffin pans with muffin cups. In a medium bowl, mix together the sugar, butter and oil. Beat in eggs, one at a time until well incorporated. Stir in vanilla, buttermilk, zucchini and chocolate chips.In a separate bowl mix together all of the dry ingredients. Add the liquid ingredients and mix until well combined. Spoon batter into muffin cups. Bake in the center of the oven for about 25 minutes. Cool on a wire rack. (Note: Don't overcook them or you will lose all the moist goodness - you want them to look almost done in the oven - they will continue to cook for a few minutes after you pull them from the oven from the residual heat).

I made these for my youngest son Sam’s first birthday party. Yes, it is true that Sammy outright refused to taste even a bite of this delicious cupcake, but that is by no means a reflection of the quality of this recipe. Sammy prefers stink bugs and mulch to human food; I’m hoping he evolves soon. Maybe I’ll try again for his second birthday.

Tomorrow I announce the “savory” winner of the Zucchini Challenge and thanks again to Sara for today’s recipe!