Showing posts with label gluten-free. Show all posts

Thursday, March 15, 2012

How to become "The Best Cook in the World" (by Cade's standards)


Aside from the occasional batch of chocolate chip pancakes, I’ve done about zero cooking in the past week or so. I had 2 cans of cannellini beans and one of vegetable broth staring back at me from the narrow ledge behind the kitchen faucet. They’d been sitting there for 3 weeks, trying their best to look pathetic and unwanted, the bottom edge of one can slowly rusting in the small puddles produced from rinsing dishes in a shallow sink. I could almost envision my cooking expertise setting up there beside them, pouting and mumbling, “She’ll forget about me completely before this trip is over. Soon it will be Hungry Man microwave dinners and Taco Bell for every meal.”

To be honest, I kind of had the same fears. Willie (our affectionate name for our bus/rv) isn’t exactly a culinary muse. His kitchen quarters are tight, his burners take light years to bring a pot of water to boil, and his sink can comfortably hold a dirty tablespoon and a small cereal bowl; anything more teeters on complete chaos. Therefore, while my heart wants to cook, my reason says, “Too much work.” So I feed my children yet another bowl of Cheerios and occasionally throw in a Nutella sandwich just to mix it up.

Until yesterday. I simply had to cook something. Forget the fact that our refrigerator was bursting with the fruits of others’ labors (an outstanding veggie soup from Shawn’s Aunt Kate , Panera leftovers, and piles of sweet Florida strawberries); I needed to blow the dust off my fingers and get them wrapped around a spatula and the handle of a frying pan, even if no one ate what they had to offer.

Well, it seems their offerings weren’t half bad; in fact, they even elicited a “You are the best cook in the entire world!” from my dear Cade; wow, I love that kid. Really, though, if you are looking for some hearty fare to make their bowls empty and their bellies full, this is what’s for dinner tonight.

Mai’s Ham and Bean Soup

2 tbsp. olive oil

2 garlic cloves, minced

¾ c. sweet onion, chopped (This is about half of a medium onion.)

2 c. cooked ham, chopped (I got this really tasty piece down here in Sarasota at a Farmer’s Market; some local yocal brand. It had a slight hint of maple in it. Mmm. Mmm.)

1 (14 oz.) can vegetable broth

1 bay leaf

¾ tsp. herbes de provence

2 (14 oz.) cans cannellini beans, drained

Saute garlic and onion in oil till soft, about 10 minutes (or 2 hours if you are cooking in Willie). Add ham, broth, bay leaf, and herbes de provence and simmer for 10 minutes. Add beans and cook for 10 additional minutes, and dinner’s done.

I served the soup with simple slices of bread, but if you are feeling a little frisky and happen to have an oven (which Willie does not possess), I’d encourage you to whip up a batch of cornbread and serve this over top a big slice. Merely a suggestion, but a really, really good one at that.

Thursday, January 5, 2012

Creating Omnivores: Mai's Early Morning Pot-Roast


For the new year, my husband and I committed to getting up together in the mornings, 6 am specifically, so that we could stop the hectic cycle of being awakened by the kids at 7:30am, jumping out of bed in a state of frenzy, and beginning the day feeling simultaneously overwhelmed and exhausted.


Monday morning, we began.

Monday, January 2, 2012

A New Year's Challenge (With Vegetarian Chili on the Side)

Two Thursdays out of most months, I scurry around my kitchen assembling all the necessities for cooking (pots, utensils, aprons, etc.), stuff it all in an empty box or laundry basket, load it in my minivan along with my two oldest children, and drive the short distance to the local food pantry where we volunteer.

My role there is simple: cook.


I receive the same items for a meal that the food pantry patrons will receive at that day’s distribution. And with those ingredients, I create recipes that will give them options for interesting and healthy meals, then I make those recipes for the patrons while they’re waiting for their opportunity to gather their rations from the pantry.


I love to cook, so when this role presented itself, the fit felt perfect. But over the past year, the cooking has become secondary. Even now emotion chokes in my throat as I think of last month’s demonstration and the petite, white-haired woman who, with red-rimmed eyes, relayed to me the dire circumstances of her husband’s health, and how, without insurance, they couldn’t afford to buy the medication that keeps him breathing.


“I’m so so sorry,” I whispered, tears blurring her form before me as she spoke.


“He says he’s not afraid to die, but he’s not ready yet,” her voice quivered as she whispered the next few words, “and I’m not ready to lose him.” As I slid my arms around her trembling shoulders, shaking with her stifled sobs, I felt helpless. I felt small. I felt ill-equipped.


And I felt that I was right where I needed to be.


In the New Year, so often our resolutions center around self-improvements we hope to achieve through more effort: lose weight, eat healthier, exercise more.


I challenge you this year to follow your passion (cooking, art, singing, photography, etc.) to a place where you don’t have the solutions or the answers, to the place where you are simply arms open wide ready to welcome the broken-hearted.


And just see the self-improvements that come from that.


Today’s recipe is taken from one of the cooking demos I did this past year. It’s cheap (a plus after the havoc the holidays can have on our finances), healthy (because the holidays tend to wreak even more havoc on our waistlines), and oh-so-easy.


Mai’s Vegetarian Chili


2 tbsp. olive oil


1 c. chopped onions or 1 tsp. onion powder


1 garlic clove, chopped or ½ tsp. garlic powder


1 tbsp. chili powder


1 tsp. cumin


1, 28 oz. can of crushed tomatoes


1, 14 oz. can of pinto beans, drained


1, 14 oz. can of black beans, drained


1, 14 oz. can of sweetcorn, undrained


1 c. vegetable broth (if you’re not too worried about the whole “vegetarian” bit, beef broth works nicely here)


¼ tsp. ground pepper


1 ½ tsp. salt


In a large pot, heat olive oil. Add onions and garlic, and sauté for 5-8 minutes, or until veggies are softened. Add chili powder and cumin and sauté for another minute. Then add tomatoes, beans, corn, pepper, and salt (if you made the bean salsa recipe from last week, feel free to throw your leftover beans and corn into the chili at this point for a slightly chunkier version). Simmer for 30 minutes and serve.


My kids can’t get enough of this chili. When I’m feeling down in the dumps, I simply whip up a pot of this and sit back in my easy chair to absorb all the compliments. When I made this for lunch last week, my daughter, after eating a bowl full, stormed into the bathroom where I was showering and declared, “Mom that chili was delicious!” and then quickly exited. Gotta love that kind of affirmation!


Saturday, December 31, 2011

New Year's Eve Special: Easy Bean Salsa

You awake bleary-eyed as the fog of your dream world quickly clears and the morning light snaps your consciousness to the present-

It’s New Year’s Eve tonight and you have nothing prepared.


Fear not, my holiday-weary friend; I’ve got the salsa covered. If you’re like me, you hate to give that frazzled appearance with your food choices by serving up jarred salsa and dips. You want to look like you’ve been planning this spread for weeks, cooking for days, and tablescaping for hours. So I provide for you a short-cut.


Today’s recipe consists mostly of pantry staples with a few fresh veggies thrown in to add that “homemade” flair. In 10 minutes flat you can have this baby in your fridge and the flavors melding while you put the finishing touches on dessert or scrub off all the globs of old toothpaste stuck to the bathroom counter (that’s where you’ll find me).


Note: If you are expecting a big crowd, this recipe can easily be doubled or tripled depending on your need.


Mai’s Easy “Peasy” Bean Salsa (I love the pun here.)


1 cup of canned black-eyed peas*


1 cup of canned black beans*


1 cup of canned white sweet corn*


1, 10oz. can Mexican-style Rotel tomatoes, drained


½ c. green pepper, finely chopped


1 green onion, both white and green parts, finely chopped


1 garlic clove, finely chopped


Salt and pepper to taste


Tortilla chips, for serving


Mix everything (except chips, of course) in serving bowl. Cover with plastic wrap and chill for several hours to allow all the flavors to dance and mingle. Serve with tortilla chips.


*You will have leftover beans and corn, but don't even dream of throwing them out! Tune in Monday for a delicious vegetarian chili that will make great use of those extras.


Happy New Year, friends!

Friday, December 16, 2011

Day 9: A Gluten-Free Special

I have just realized that in my past 1 ½ years of blogging, I have already imparted to you some of my most beloved cookie recipes, therefore, you will have to forgive the occasional recipe repeat that may appear on this countdown. Be assured that if a recipe is repeated here, it has happened out of necessity.

Day 9’s inductee into the countdown is really a shout-out to all you gluten-free folks out there. I just want to let everyone know that GF’s still know how to have fun, and this little humdinger proves my point.


This cookie is chocolate on a chocolate high. It’s over the top and that’s why I love it. Sometimes we need to cut loose a little bit, let our hair down and relax. I have really short hair so this is my compromise—I eat one of these.


Many thanks to Bon Appetit for once again splashing life onto my palate by introducing this recipe to me!


Deep Dark Chocolate Cookies


1 1/2 c. bittersweet chocolate chips, divided


3 large egg whites, room temperature (I didn't have mine at room temperature so I just sat them in a bowl on a towel set on the preheating oven and in about 10 minutes they were just right.)


2 1/2 c. powdered sugar, divided


1/2 c. unsweetened cocoa powder


1 tbsp. cornstarch


1/4 tsp. salt


Preheat oven to 400 degrees. Line two baking sheets with parchment paper. You could take a gamble and try to make these just by greasing your baking sheets but I like a sure bet like parchment paper; I'm a play-it-safe kind of girl. Melt 1 cup of chocolate chips in glass bowl in microwave, checking and stirring about every thirty seconds, just until the chips melt and are smooth. Cool slightly.


Using electric mixer, beat whites in large bowl to soft peaks. Gradually beat in 1 c. sugar. Continue beating until mixture resembles soft marshmallow creme. Whisk 1 cup sugar, cocoa, cornstarch, and salt in medium bowl to blend. On low speed, beat dry ingredients into meringue. Stir in lukewarm chocolate and 1/2 cup chocolate chips (dough will become very stiff).


Place 1/2 c. sugar in bowl. Roll 1 rounded tablespoon dough into ball; roll in sugar, coating thickly. Place on prepared sheet. Repeat with remaining dough, spacing 2-inches apart. Bake until puffed and tops crack, about 10 minutes. Cool on sheets on rack 10 minutes. Transfer to rack; cool.

Thursday, November 17, 2011

Gluten-free Pumpkin Crisp--A New Thanksgiving Tradition


Thanksgiving is fast approaching, my friends, and for you gluten-free folks out there, it can be a bittersweet occasion. You see your family and friends enjoying the fruits of wheat-laden cooking and baking while your plate looks rather bleak minus the bread stuffing, gravy, green bean casserole, homemade dinner rolls, pumpkin pie…I could go on, but I won’t.

Or perhaps you celebrate this holiday with a family of gluten-free believers who have found creative ways to make Thanksgiving dinner with tasty, digestive-friendly alternatives to the traditional fare.

Whichever group you are in, I present to you a splendid, gluten-free pumpkin crisp that will entertain any palate. I will actually go so far as to say that you could forgo the pumpkin pie this year and serve this alone and there would be not a whisper of protest. It’s that good.

Mai’s Gluten-free Pumpkin Crisp

3 c. fresh pumpkin (if you use canned pumpkin, up the evaporated milk to 1 c.)
¾ c. maple sugar (but white sugar works just fine here if that’s all you’ve got on hand)
¾ c. evaporated milk
4 eggs
1 tsp. cinnamon
1 tsp. pumpkin pie spice
1 tsp. vanilla extract

Topping:
¾ c. packed brown sugar
¾ c. gluten-free quick oats
¾ c. chopped walnuts
¼ tsp. cinnamon
6 tbsp. butter, melted

Whipped cream or vanilla ice cream to serve

Preheat oven to 350 degrees.

In a large bowl, combine pumpkin, sugar, milk, eggs, cinnamon, pumpkin pie spice, and vanilla. Mix until smooth and then pour into buttered 8-inch baking dish and bake for 25 minutes.

Meanwhile, make topping by combining brown sugar, oats, walnuts, and cinnamon in a small bowl. Toss ingredients in melted butter. When the pumpkin mixture has baked for 25 minutes, gently top it with crumble mixture and bake pumpkin crisp for an additional 20-25 minutes, or until topping is golden brown.

Serve with sweetened whip cream or vanilla ice cream, and don’t begrudge all the folks who are passing up the gluten-rich desserts to feast on your treat; remember: ‘tis the season for thankfulness.

Wednesday, October 19, 2011

My Past, Present, and Future Through the Eyes of Food


Thinking back through my life, I’ve realized I can categorize each major phase of my past based upon the ethnic foods I ate or cooked during that time. Strange, but true:

Childhood- Hawaiian/Chinese- My dad was born and raised in Hawaii so most of my childhood years were spent eating meals of my dad’s homemade teriyaki and rice, chicken curry stew, and char sui. Even after my parents split up, we’d spend many week nights at my dad’s apartment slurping up saimin while my mom worked 2nd shift at the airport. To this day, the first thing that signals I’ve arrived at my parents’ house is the wafting aroma of soy sauce and garlic I smell with the first step I take through their front door.

College- Italian- I don’t know that it’s really fair to label the pizza served at the Messiah College Falcon Express as truly “Italian” but I did eat an exorbitant amount of pepperoni pies and deliveries with “The Works” during my college years. Whenever I smell a Papa John’s Pizza, I’m immediately transported back to the fluorescent-lighted halls of the Miller/Hess dorm in Grantham, PA.

Early Marriage-Southern American- As a young domestic goddess, I really cut my “cooking” teeth by preparing the traditional American/Southern dishes that inspired me through the pages of magazines like "Taste of Home" and "Quick Cooking". Shawn and I ate lots of casseroles back then: meat, cheese, and rice combos with cheap ingredients and lots of leftovers. Nothing exotic or even that flavorful, but I took great pride in the fact that “I cooked it!”

England- Indian- When we moved to England, my culinary eyes were finally and fully opened to the vast array of flavors that existed out there in the great big world. And my love (and sometimes obsession) with Indian food began. The New Akash in Great Missenden drew me in with their pristine silver serving dishes, coddling wait staff, and Lamb Tikka Bhuna with Saag Aloo that convinced me I must have lived in the city of Bombay in another life.

And now I’ve hit a phase where there seems to be no dominant theme, either in the food or the purposes of my life. It’s a crossroads, I’m realizing, and it’s exciting, seeing my past mesh beautifully with my present, creating my future:

On Monday I am a girl again, marinating long slices of cold, marbled beef in my dad’s rich teriyaki sauce.

On Tuesday, I feel the care-free naivete of my college self as I roll out the soft, fragrant dough for my cheese pizza.

On Wednesday, I adopt the thrift and carefulness of my young married self, tears gliding down my cheeks as I chop candy-sweet onions for my chicken and rice casserole.

On Thursday, I feel adventurous yet wise, grinding the spices of my Lamb Vindaloo in my mortar and pestle, fragrances of cumin and ginger swirling through my kitchen.

And on Friday, I can be something altogether new…

Mai’s Mexican Casserole

1 lb. ground beef, cooked and drained
1 recipe of Mai’s crockpot refried beans, (but don’t mash up the beans once you’ve cooked and drained them and there's no need to save the liquid. The beans in their natural, cooked state are all you're after here.)
2, 10 oz. cans enchilada sauce (or by all means, use your own. If anyone out there has a good enchilada sauce recipe, I’d love to have it!)
1, 8 oz. can tomato sauce
1, 16 oz. pkg. of corn tortillas, torn into bite-size pieces
1 lb. of Mexican blend cheese
salsa, sour cream, and green onions for toppings

Preheat oven to 350 degrees and grease a 9x13 inch pan.

Combine first 4 ingredients in a large saucepan and bring to a simmer, just to warm all the ingredients through. Meanwhile, layer half of torn tortillas in the bottom of the prepared pan. Spread half of meat/bean mixture over top of tortillas. Sprinkle half of cheese on top of meat/bean mixture. Repeat layers, ending with cheese.

Bake for 25-30 minutes, or until casserole is bubbly and cheese is melted. Serve with salsa, sour cream, and green onions.

So what about you? Can you categorize phases of your life the same way? What phase are you in now?

Wednesday, October 20, 2010

How Donald Miller Inspired Mai's Brown Sugar Walnuts

About a month ago, I read a completely life-changing book called “A Million Miles in a Thousand Years” by Donald Miller. The Cliff’s Notes version would go something like this:

Don is a relatively famous author who is approached one day by a couple of film guys who want to make a movie about Don’s life. Don says, “why the hell not” and they begin collaborating on a screenplay. But before Don knows it, he realizes that his life isn’t all that exciting. He spends most of his time either in front of his computer being a writer or in front of his tv living vicariously through others. When he looks at his life through the lens of a story, he sees that he is living a very bad and a very boring story. So he decides to write a better one by living a more intentional life. He actually asks out girls instead of daydreaming about it. He loses weight, starts biking and eventually bikes all the way across the US. He starts up a non-profit for underprivileged children. Basically, he starts living a life that is inspiring and meaningful and beautiful. Then he encourages his readers to do the same thing.

I really needed this book when it came across my path. I was feeling stuck in life, not sure what my purpose was. I know, I know. I can hear it now, “But you’re a mom, and that is one of the most important jobs in the world; you should be proud of that role.” Believe me, I am. But I’m not content with that being my only role because I have other passions, particularly cooking, that can’t be explored in the context of motherhood.

Sure, I cook (multiple times at least) every single day for my kids and sometimes I do really enjoy it and find it rewarding. But what I really love is having the kitchen to myself with the ingredients for a challenging new recipe sprawled out on the counter before me, and all day long to learn and explore and finally create a piece of edible art to share with my family or friends. I miss that.
So after reading Mr. Miller’s book, I decided to take my life by the reins and look for opportunities to pursue my passion for cooking outside of my role as “Mama”. And tomorrow I get to make good on one of those opportunities: I’m doing a cooking demonstration for the Jars of Hope Food Pantry at the Gap Family Center--while families are picking up their groceries from the pantry, I’m going to be demonstrating how they can use what they’re receiving to make healthy, tasty meals at home.
It’s amazing to me how your soul seems to come alive when you are able to combine your passion with serving others. All week I’ve been concocting different kinds of recipes in my kitchen like some sort of mad scientist, and it’s been oh so fun. But at the end of the day, cooking is just a bunch of steam and victuals if you have no one to share it with. So that is why I’m most excited about going to the pantry tomorrow. I’ll have the chance to get to know the families, the moms and dads who may need a little encouragement or hope, or another grown up to talk to, or just something tasty to eat. I get to use my knowledge of food and cooking for more than just satisfying my own palette, a welcome change, I must say.
But for your at-home enjoyment, here’s a little recipe that I’ll be handing out at the pantry tomorrow…
Mai’s Brown Sugar Walnuts
2 tbsp. butter
¼ c. brown sugar
¼ tsp. salt
¼ tsp. cinnamon
1 c. walnut pieces
Melt butter in small saucepan over low heat. Add sugar, salt, and cinnamon, and stir until sugar dissolves and mixture just starts to boil (don’t burn-this will only take about a minute or two). Add walnuts and stir to coat nuts. Pour nuts onto piece of foil to cool.
I dare anyone to come up with a food that these would not taste divine on. Sweet potatoes? Yes, please. Yogurt? Absolutely. Pancakes? Hell, yeah! Roasted Pork Loin? Yep. Brie? Of course, and now I’m really beginning to tire of this exercise. They taste good on anything, people. Just eat them. Period.
Oh, and read Don Miller’s book. Period.

Wednesday, October 13, 2010

The Cookie (it needs no other introduction)

I'm gonna be honest with you all, lately my time in the kitchen has produced some pretty lame results. I tried a lentil soup earlier this week and it was okay, but didn't wow me. Same with the breakfast burritos I made for dinner tonight. I always know I've really created something great when I lean back in my seat after a meal and say, "That's better than a restaurant. Gordon Ramsey eat your heart out."

I haven't said that in a while...

except for this cookie recipe that I made last week for some friends we had over, and forgive my pride, but these chocolate lovelies were from another planet, so delightfully light and chewy and filled to the brim with chocolate that I had a lot of trouble sleeping that night from all the caffeine (I think this legitimizes eating them for breakfast, you know, for the energy boost; it's just like a cup of coffee, right?).

Okay, truthfully though, I didn't make this one up so I've gotta give props to Bon Appetit for printing this in one of their magazines in the past 10 years because I'm not sure which one I ripped it out of during the decade that I've been subscribing. But I do congratulate myself at knowing a great recipe when I see one. I know it's a bit of a stretch, but I'm kind of in a culinary drought at the moment and I'll take what I can get.

Seriously, though, make these cookies. Please, do this for yourself.

And eat the entire batch. Then be prepared for a tremendous caffeine high.

Hey, and for all you gluten-free folks out there, I think this recipe may actually qualify!

Deep Dark Chocolate Cookies

1 1/2 c. bittersweet chocolate chips, divided
3 large egg whites, room temperature (I didn't have mine at room temperature so I just sat them in a bowl on a towel set on the preheating oven and in about 10 minutes they were just right.)
2 1/2 c. powdered sugar, divided
1/2 c. unsweetened cocoa powder
1 tbsp. cornstarch
1/4 tsp. salt

Preheat oven to 400 degrees. Line two baking sheets with parchment paper. You could take a gamble and try to make these just by greasing your baking sheets but I like a sure bet like parchment paper; I'm a play-it-safe kind of girl. Melt 1 cup of chocolate chips in glass bowl in microwave, checking and stirring about every thirty seconds, just until the chips melt and are smooth. Cool slightly.

Using electric mixer, beat whites in large bowl to soft peaks. Gradually beat in 1 c. sugar. Continue beating until mixture resembles soft marshmallow creme. Whisk 1 cup sugar, cocoa, cornstarch, and salt in medium bowl to blend. On low speed, beat dry ingredients into meringue. Stir in lukewarm chocolate and 1/2 cup chocolate chips (dough will become very stiff).

Place 1/2 c. sugar in bowl. Roll 1 rounded tablespoon dough into ball; roll in sugar, coating thickly. Place on prepared sheet. Repeat with remaining dough, spacing 2-inches apart. Bake until puffed and tops crack, about 10 minutes. Cool on sheets on rack 10 minutes. Transfer to rack; cool.

Saturday, September 4, 2010

Money, Money, Money: Revolution Roadblock #2

A big thanks to all of you out there who decided to get involved in the charity:water project that was introduced on Tuesday; it feels pretty great when we get to be a part of something bigger than ourselves by helping people other than ourselves. Please pass on the word and let's reach that goal!!

Today, I'm back on my old soap box again. When attempting a Food Revolution (like I am) you have to be aware of the hindrances that keep something like this from really taking off. A couple weeks ago I tackled the issue of time aka Revolution Roadblock #1.

I think the next biggest obstacle will probably ring true for quite a few of you out there; I know it does for me. I think I’ve mentioned before that I am a stay-at-home mom and my husband is a writer and we have four little babes, so we aren’t exactly rolling in the old greenbacks.

I appreciate the fact that buying organic or even fresh fruit and veggies isn’t always (most times, never) the most budget-friendly choice. The truth is, I don’t ALWAYS buy organic. I buy it when I can. I basically have a hierarchy system to help me figure out what and when I should buy organic, which I will share with you tomorrow.

But while I am acutely aware of the challenges a strict budget can present when trying to feed your family a healthy diet, I by no means think it is impossible. Last week I had a pathetically small grocery budget to work with because I had a few too many splurges in the middle of the month which left me with very little for the end of the month. I kind of have a habit of doing this.
Honestly, though, I kind of like the challenge. There's something really satisfying in knowing that I've fed a family of 6 with less than $5 worth of ingredients. Okay, I don't want to do this every night, but occasionally it is kind of fun. And below is most definitely one of my favorite budget-friendly meals of all time for these reasons, in no particular order:

1. Because it's got an Indian flair to it, and I absolutely adore Indian food. I could honestly eat it every day for every meal, and that's no where close to being an exaggeration. Just ask my husband.

2. I made this recipe last Wednesday afternoon while my kids were spending a couple hours at their grandparents' house. When my son walked in the door at dinnertime, he shouted, "It smells AMAZING in here!"

3. It tastes even better than it smells. My kids, ages 1 to 7, all loved it and cleaned their bowls. Since there were no leftovers to scavenge, I had to eat a second bowl myself. Oh, darn.

4. It's vegetarian, so it's easy on my conscience and my pocketbook.

With no further ado:

Indian Lentils and Rice

1 tbsp. olive oil
3/4 c. chopped onion
3 garlic cloves, minced
1 tbsp. minced peeled fresh ginger (Don't try and use ground ginger in this and think you're going to get away with it. A little knob of fresh ginger from the produce aisle will cost you about a quarter. I think you can splurge.)
1 1/2 tsp. curry powder
½ tsp. ground cumin
4 c. water
1 ½ c. dried red lentils (You can find these in the Hispanic section of your supermarket. If you've never used lentils before and you have a tight food budget, may I introduce you to your new best friend.)
1 c. chopped fresh tomato (The other day when I made this, I didn't have any tomatoes so I just used 1 1/2 c. tomato sauce and reduced the water to 3 cups. Worked beautifully so consider that as an option.)
1 tsp. salt
¼ c. chopped fresh cilantro
3 c. freshly cooked rice

My kids are a little nutso about their food having a smooth texture, so I just go ahead and whiz the onion, ginger, and garlic together in the food processor. Heat the olive oil over medium heat and add the onions, ginger, and garlic and saute for a couple minutes, just to soften. Then add the curry powder and cumin. Stir that around in the pan for about 30 seconds, just to get the spices nice and toasted. Add the water, lentils, tomato, and salt. Simmer for about 20 minutes, or until lentils are soft. Add the chopped cilantro, pile on top of the rice, and you are ready to tuck in.

This recipe will usually feed my entire family for dinner and have enough leftovers for me to sneak in the next afternoon and scarf the rest down for lunch before my husband catches wind of my devilry. Hee, hee.

Wednesday, August 11, 2010

Hell Hath No Fury Like a Red Hot Pepper

The tomato influx from our garden is starting to subside now. I’m a little sad about it, to be honest. When the zucchini plants dried up, I have to admit that I did say a quiet prayer of thanksgiving; I can only eat so much zucchini in all its various forms before I start to tire of it. Not so with tomatoes. There are just so many options: spaghetti sauce, hot sauce, tomato soup, blt’s (if I’m not feeling too guilty about pork on that particular day), tomato and herb cream cheese sandwiches… I think I could go on indefinitely.

But my favorite thing to do with tomatoes this summer is to cook up a nice big batch of salsa. My intentions have been good. Every time I make a batch, I imagine that I will set back at least ½ of the amount to freeze for the winter. I’ve made about 5 batches by this point, and I’ve only set back a single one-cup container in my freezer so far; we’ve become serious salsa addicts around here (I’m starting to think we have very addictive personalities, my husband and I).

This salsa can be as hot or as mild as you choose. We love hot food in our family so I tend to throw in at least 4 or 5 thai chilies just to amp it up a bit. If you decide to go that route, please, please, please be careful as you are chopping and handling the hot peppers. I am currently typing with severely burned fingertips because I chose to ignore my good sense when chopping up some peppers for a curry I was making tonight. For your enjoyment, I’ve typed out the inner dialogue that took place about this topic (G.S.= Good Sense):

G.S - “With all this handling of hot peppers, you should probably put some gloves on”.
Me – “That is so stupid. It’s not like I’m an amateur here.”
G.S. – “I’m not saying you’re an amateur, I’m just saying that there are always those warnings when recipes call for hot peppers and I don’t think they put them there for no reason.”
Me – “When you show me a picture of Jamie Oliver sporting big rubber yellow gloves to chop up a few chilies, then I’ll think about wearing them. But until that time, shut it.”

Well, Jamie Oliver must have hands of iron or keep pictures of his gloved hands under lock and key, because, wow, it really hurts. Granted, I’ve chopped plenty of small peppers in my day without donning plastic mittens, but the ones I was cutting today were some big boys and I think they had a debt to settle with me. Ouch.

Mai Stovetop Salsa

1 tbsp. extra virgin olive oil
1 c. onions, chopped
3 garlic cloves, chopped
5 (or more) red thai chilies, chopped (Leave this ingredient out if you don’t want the heat. Or if you’re really feeling brave, add a habenero in there. That’ll really light you up.)
3 banana or Hungarian wax peppers, deseeded and roughly chopped
10 ripe medium-sized tomatoes, seeded and cut in 8ths
1 ½ tsp. chili powder
½ tsp. cumin
¾ tsp. sea salt (You can use regular salt, too. Sea salt just makes me feel sophisticated.)
2 tbsp. chopped cilantro
1 lime

Heat the oil in a large saucepan. Add onions, garlic, and both kinds of peppers. Saute for 2 or 3 minutes, just to soften them up. Add the tomatoes, chili powder, cumin, and salt. Cook over medium heat for about 15 to 20 minutes or until all the veggies and tomatoes are really soft and mushy. Let the mixture cool for about 10 minutes or so before putting in the food processor and pureeing to your desired consistency. Add juice from 1 lime and cilantro, and serve.

Now I must go coddle my poor little throbbing, aching fingers. Have a great weekend, everyone!

Friday, August 6, 2010

A Hero To Rescue You from Your Appetizer Fears

Here’s the scenario: You’re invited to a get-together and when the hostess starts passing out dishes for everyone to bring, you get tagged with the elusive “appetizer”. I don’t think there is any other course of a meal that can send my insecurities into a flurry than appetizers, and here’s why.

You certainly don’t want to be the schmuck that shows up with a jar of salsa and a bag of tortilla chips because, well, frankly, when the main course of beautifully seasoned salmon hits the table, your offering looks like a pile of wood chips with a motor oil dipping sauce. But preparing a good appetizer can seem overwhelming because a lot of really good, and impressive, appetizer recipes take time, especially if you’re really hoping to “wow” your friends.

To everything there is a season. There may come a day, once again, when I have 4 or 5 extra hours just floating around in my day where I can spend time making fancy little apps without children shimmying up and down my legs and asking for snacks on a continuous basis. That day will come. But it isn’t a reality in my life at the moment so I’ve gotta find shortcuts that get me what I want but with half the effort and time. If you’re looking for the same sort of deal, for similar or very different reasons, I’ve got a little something special for you.

This recipe is a beautiful, yet easy, little appetizer that my sister-in-law passed my way, and I got to try it out a couple of weekends ago. These individual quiches are so tasty and cute, and, bonus, there are no troublesome pastry crusts to get you all worked up into a lather. You do some simple sautéing, a brief mix of all the ingredients, and pour into your tartlet pans. A word of caution, however. To make your life easier and these little babies as cute as they can be, make sure you rub down your tartlet pans with plenty of butter to help the tartlets come out easier.

Suzanne’s Mini Spinach Quiches

1 tbsp. butter
1 onion, chopped
1 garlic clove, minced
1, 10oz., pkg. frozen chopped spinach, thawed and drained
6 eggs, beaten
½ c. heavy cream (This ingredient was not in the original recipe but I just can’t pass up a chance to add a little extra creaminess to any recipe.)
2 c. shredded Colby-jack cheese
½ tsp. salt
¼ tsp. pepper

Preheat oven to 350 degrees. Give your tartlet pans a good coating of butter.
In a large skillet, sauté onions and garlic until soft. Stir in spinach and continue cooking till excess moisture has evaporated. Let mixture cool slightly while you mix eggs, cream, cheese, salt, and pepper in a large bowl. Add spinach mixture and stir to blend. Pour into mini tartlet pans and bake for 10 to 12 minutes.

When I made these a couple of weeks ago, I didn’t really have time to experiment with garnishes. I was literally scooping them out of the pans while my husband and kids were waiting in the car, ready to leave for the dinner party. But I imagine that a side of fresh salsa or even a small dollop of sour cream and a tiny sprig of cilantro would gussy up these little ladies even more.
Thanks, Suzanne, for this great recipe! Have a delicious weekend, everybody!

Wednesday, August 4, 2010

A Fond Farewell to Sweets

Well, I’m back and, folks, I don’t even know where to begin with all the gastronomical soul searching I’ve been doing over the past almost two weeks: swearing off sweets, vowing to kick the “chain restaurant” habit, nearly devouring the actual menu at my new favorite eatery because absolutely everything on it looked divine… I could go on but this is all such good fodder for future blogs that I will pace myself.

So I begin at the beginning…my week long fast from sweets.

I made it!

Technically.

Okay, actually, I took kind of a Jewish approach to the topic. In the Jewish tradition, a day actually begins and ends at sundown so the fact that I didn’t eat a plate full of assorted desserts until the sun went down on Sunday could qualify as a successful completion of my task.

Folks, throw me a bone here. I passed up a foot-high (no lie) chocolate and peanut butter cake mounded with Reese cups at the bridal shower on Saturday; I earned a loophole for Sunday.

Anyway, all that to say, while I loved each bite of the desserts I had on Sunday and all of last week while we were on vacation, I came to the supernatural realization that eating sweets just makes me feel like crap. I get headaches, I feel nauseous, my emotions are all over the chart. While my week without sweets was definitely hard, I physically felt so good.

Therefore, I’m setting up a challenge for myself, and I’m expecting you all to hold me to this new standard: I want to keep sweets for special occasions instead of what they were becoming in our household—a staple. My goal is to keep all cookies, ice cream, candy, and pastries out of our house, so they become treats we can enjoy occasionally instead of everyday.

However, there is one thing I will not give up so I'm warning you now to just save your breath: Ghiradelli’s 60% Cocoa Chocolate Chips. I did a little research online to try and strengthen my case for these being a health food, but chocolate has to be 65% cocoa before it’s classified as a true dark chocolate with all the healthy goodies.

Nonetheless, I’m not letting go of them. I mean, it’s 5% away from being pristine and full of antioxidants. And one serving (no, I do not eat more than one serving in a day if you must know) has only 6 grams of sugar, a whole heck of a lot less than all those “healthy” yogurts out there, sporting sugar contents upwards of 30 grams. So, there, I’ve made my case and I feel good about it.

Alright, the main reason I love these chocolate chips so much is because they are an essential ingredient in my homemade rustic granola. (This is the recipe I alluded to last month when my food budget was running low and couldn’t sustain a large purchase of nuts.) So as a trade-off for allowing me to keep the chocolate chips in my cupboard, I offer to you my beloved recipe.

Note: This granola is not for the weak-jawed. There are lots of nuts in it, and I keep them all whole because I find it keeps them from getting too dark in the oven and, more importantly, because I love crunchy food. Should all the chewing and crunching be too much for you, just chop them up.

Mai’s Rustic (and Nutty) Homemade Granola

5 cups old-fashioned oats
1 ½ c. walnuts
1 ½ c. pecans
1 ½ c. almonds
1/3 c. canola oil
1/3 c. honey
½ c. flaked coconut
2/3 c. dried blueberries
1 c. Ghiradelli’s 60% dark chocolate chips

Preheat oven to 275 degrees. Mix oats, walnuts, pecans, and almonds in a large bowl. In a glass measuring jug, combine oil and honey and zap in the microwave for about 30 seconds, just to get it nice and runny. Pour the oil/honey mixture over the oats and nuts in the bowl, and mix till everything is coated. Bake for 1 hour, stirring occasionally. After you bring the granola out of the oven, add the coconut and blueberries. Cool completely and then add the chocolate chips.

I actually passed up a Reese Cup Sundae in exchange for this granola tonight. That’s saying something. I guess there’s hope for me yet.

Tuesday, July 20, 2010

Baked Oatmeal: The Perfect Marriage of Breakfast and Cookies

“She’s gotta be lying”, “Well, I never…”, “Oh, come on. This is a joke.” These are the typical responses I predict will occur when you read the following line:

At the age of 27, I took my first bite of baked oatmeal.

Shocking, yes, but truthful nonetheless. I always loved my bowl of hot oatmeal in the mornings and oatmeal cookie dough is my favorite raw batter treat, but for almost 3 decades of my life, I never even knew a hybrid of these two staples in my diet existed. I mean, I'm sure you do know that’s what baked oatmeal is: an oatmeal cookie formatted in such a way that it qualifies as a breakfast food—beautiful.

I’ve had a lot of baked oatmeal recipes in the 5 years since my first bite, and honestly, the first recipe I ever had is still my favorite. The recipe is from my dear friend, Becca, who got it from someone else, but since I don’t know that person, I’ll just save us all the trouble and call this recipe:

Becca’s Baked Oatmeal

2/3 c. oil
1 c. sugar
2 large eggs, beaten
4 c. quick oats
3 tsp. baking powder
1 tsp. salt
1 ½ c. milk

Preheat your oven to 350 degrees. Mix oil, sugar, and eggs. Add remaining ingredients and mix well. Pour into 9x13 inch pan and bake for 25 minutes.

Folks, there really isn’t a whole lot that wouldn’t taste spectacular on this. I’m going to give you a short list of baked oatmeal toppings I have enjoyed in the past and let you mix and match as you choose: fresh strawberries, fresh blueberries, fresh fruit salad (as pictured above), flaked coconut, dried cranberries, and milk. This recipe is such a lovely way to showcase the yummy berries in season right now, and I feel semi-healthy when I eat the baked oatmeal/fresh fruit combo so that’s just an added bonus.

And in tomorrow’s post, I share about the highs and lows of my “treat-free week”, a sentence imposed by my seven-year-old son, Cade.

Tuesday, July 13, 2010

Crockpot Refried Beans: Heart Healthy and Saving Cows

I know this isn’t crockpotting weather, folks, but desperate times call for desperate measures, and in case you didn’t notice, we’re in a recession. So it’s time to tighten the purse strings and pull out the slow cooker for today’s recipe. I guess if I’m really honest, making your own refried beans is not going to be your saving grace if the debt collectors come to call; it will save you maybe $2.95, and the heat your crockpot is going to generate in your kitchen will probably cause the a/c to kick in a little more often than usual, so when it’s all boiled down, you might actually pay more to make refried beans at home than buying a can at the grocery store. I’m realizing that I should probably ditch the economical argument for these beans right about now, but I won’t give up on this recipe yet. I still have the health angle going for me.

This pot of beans has no fat and tons of flavor, a perfect match to the homemade salsa you made yesterday (which I am absolutely certain that you made; probably a double batch, you over-achiever, you). Seriously, I’ve had the beans in a can and what I’m proposing below will completely annihilate anything you buy at the grocery store. And just think, by surpassing the ground beef in your tacos tonight and replacing it with these homemade, healthy, delicious refried beans, you’re saving another cow. Well done.

Crockpot Refried Beans

½ c. onion, finely chopped
1 ½ c. dry pinto beans, rinsed
½ fresh jalapeno pepper, seeded and chopped (Don’t worry if you’re not a fan of spicy. These beans don’t have any kick to them. The jalapeno just adds a nice flavor.)
2 garlic cloves, minced
2 tsp. salt
1 tsp. pepper
¼ tsp. cumin
4 ½ c. water
Shredded Cheddar Jack cheese for serving

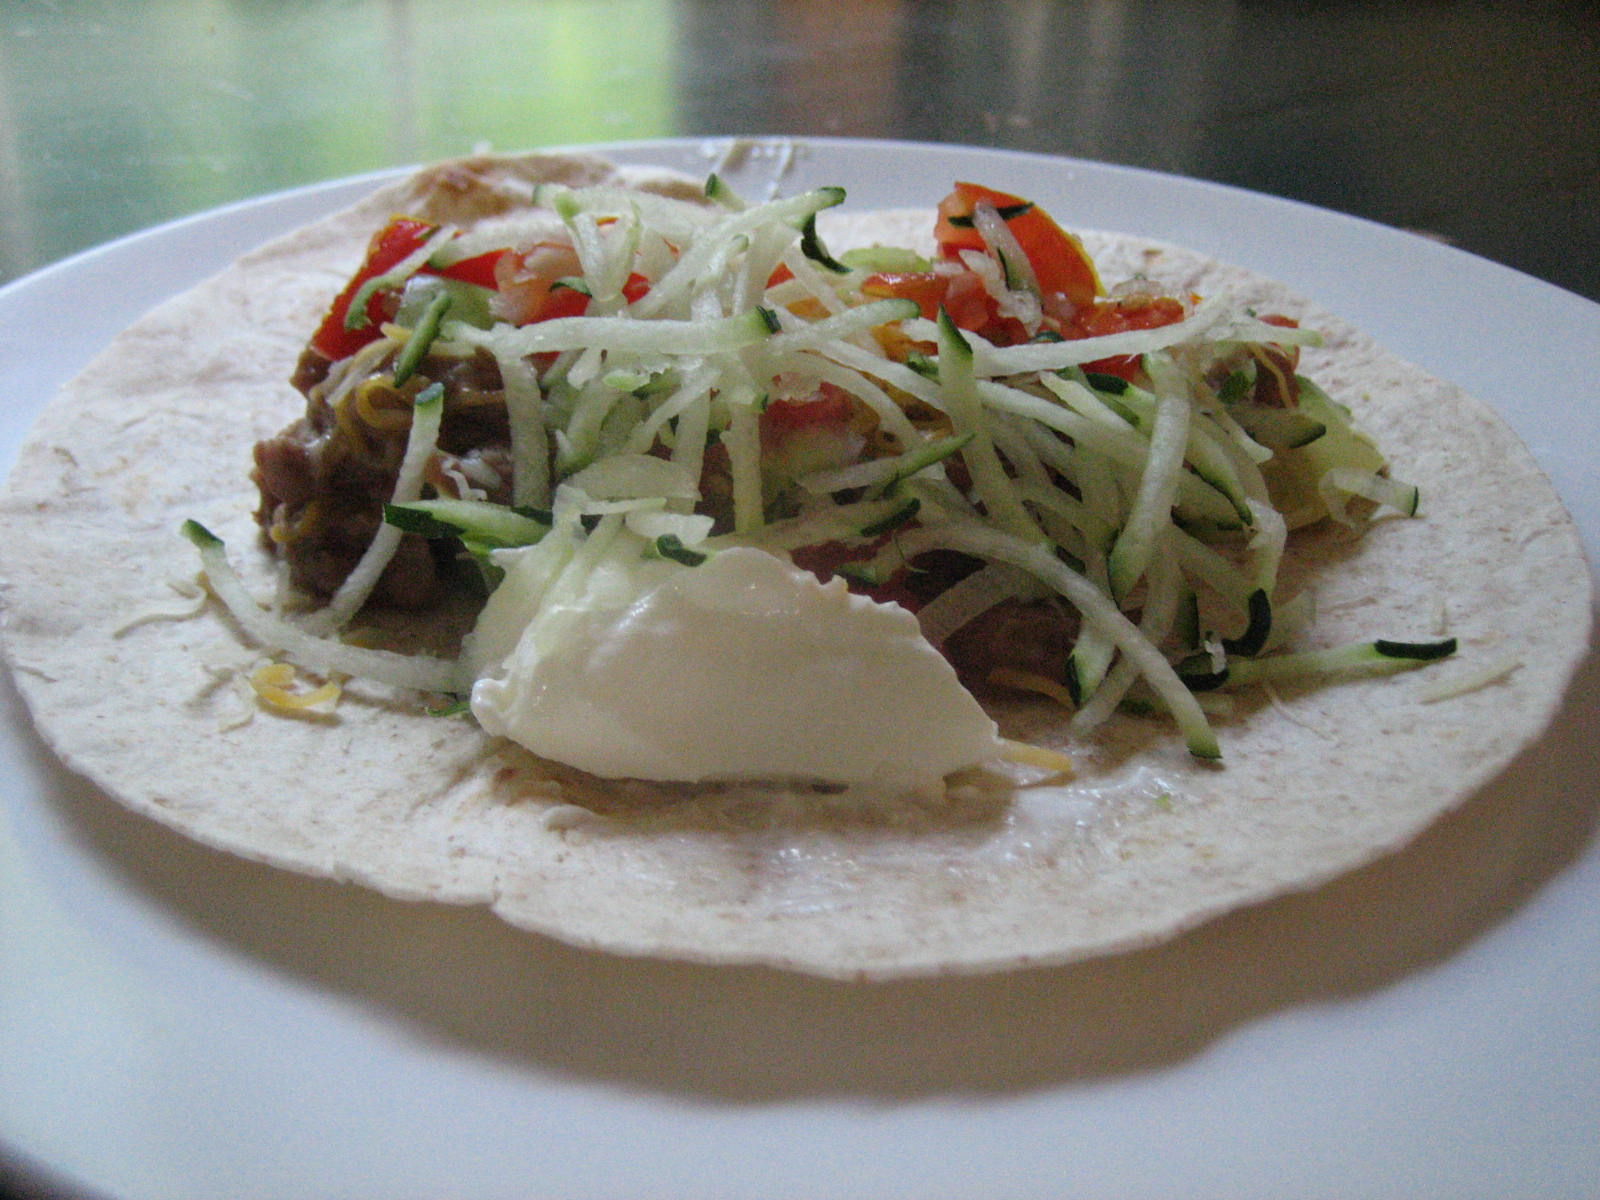
Dump everything in your crockpot, give a quick stir, and cook on high for about 6 hours (I guess it could take longer depending on your slow cooker, but the high heat on mine should be renamed “Hades” because that’s the kind of hellish heat it pumps out) or low for about 10. Strain the beans but be sure to save about 2 cups of the liquid. Mash up the beans, adding bean liquid as you mash, till the beans reach a consistency you’re comfortable with. Top the beans with a thin layer of shredded cheese. Grab your warm tortilla, slather a big spoonful of these beans down the middle, nestle some fresh salsa on top and perhaps, if you're daring, a dollop of sour cream, and dinner is ready. (In the above picture, I also have some shredded zucchini on top. Really, I have this stuff coming out of my ears right now so I pretty much put zucchini on everything that goes in my mouth. But it actually tasted really nice on the tacos so you can always give that a try, too.)

Disclaimer: While I whole-heartedly promote this spectacular recipe, I cannot be held responsible for the gastro-intestinal issues it may induce later on in the evening, so I wouldn’t suggest making this for an anniversary or Valentine’s Day dinner. Probably want to stick with pasta on those nights. Otherwise, enjoy!

Sunday, July 11, 2010

Fresh Salsa in the Jarred Salsa World

Shortly before our family made the move from Northern Virginia to Lancaster County last fall, some wonderful friends, Mark and Paula, had us over for a farewell dinner of sorts. While Paula is world-famous for her fabulous pasta with Vodka Sauce (a recipe that I may be able to coax out of her one day and share with all of you), that evening she had made fantastic quesadillas with salsa and guacamole.

For some reason the memory of that salsa stuck with me for several days afterwards; I was craving it, wishing I had just a spoonful of it to put on everything I ate. Why was obsessing over salsa? Granted, I did have a newborn so I was really sleep-deprived and suffering from serious bouts of the “nursing-munchies”, but I knew there was something deeper.

Then it hit me: her salsa was fresh, and hence, incomparable to anything I got off the shelf at the grocery store.

See, I just never bothered to make my own salsa. Call me silly, but I was one of the millions out there who thought that the jarred stuff wasn’t really much different than what I could make myself. Wow, was I wrong. And I simply can’t go back now. I haven’t had a bottle of store-bought salsa in my fridge since that fateful dinner at Paula’s house ten months ago.

Perhaps you’ve been making your own salsa for years, so this plea may fall on some deaf ears, but if fresh salsa-making is new to you, I implore you to give it a try. It will take you about 10 minutes to chop everything up, and you can make it for less than half the cost of what you pay in the grocery store for one of those sub-standard jars. Plus, "fresh" is always better for you.

Below, is my personal salsa recipe. Like I said, I’m a newbie at this so the list of ingredients isn’t going to blow your mind with creativity, but for some of you, it might be a good starting point.

Mai’s Better-than-Jarred Fresh Salsa

2 cups seeded and chopped fresh tomatoes (Don’t go trying to sneak canned tomatoes in here. This is “fresh” salsa so all the ingredients need to be “fresh”. Last week when I did my bi-monthly salsa-making, I added some green tomatoes from our garden to the salsa and I liked what it added to the ensemble so if you've got some on hand, give it a try.)

½ c. chopped sweet onion

1 jalapeno, minced (I may have mentioned before that I like my food spicy hot so this may be a no-go ingredient for you. If you are somewhere in the middle of the road on this issue, go ahead and add the jalapeno but just leave the seeds out.)

1 clove of garlic, minced (Again, “fresh” is the key word here. Don’t go using that jarred stuff; it’s just not the same. Really, it will literally take you about 30 seconds to chop a clove of garlic and if you are so hung up on your fingers not getting all smelly, just wrap some Saran over the hand that’s touching the garlic. See, now I’ve taken away all your excuses.)

1 tbsp. chopped fresh cilantro (If you don’t like cilantro, by all means, leave it out. I love, love, love it so I always include it.)

Juice from ½ a lemon

Salt and Pepper to taste

Toss all ingredients together in a bowl and you’re done…if you like your salsa chunky. Perhaps, you are like my husband and chunks in your salsa gives you the shivers. In that case, just throw it all in a food processor and blend it up. It’s best if you make it at least several hours before you are going to serve it so that the flavors can meld together in the fridge. But if you forgot to plan ahead and serving time is upon you, don’t worry: it will still be eons better than what you get out of those jars.

As I said before, I’m just starting out on this salsa-making road so I would love any suggestions or tips from you salsa-gurus out there!

Thursday, July 8, 2010

Too Much Month and Too Little Money

So it’s July 9th and I’ve already blown over half of my month’s allowance for food. Not good. At this point, Mama (meaning me) has to start looking for ways to stretch what’s already in her fridge and pantry. Well, at the moment, I have an overabundance of zucchini (and now cucumber) from the garden, but that’s just not cuttin’ it when the Mama has a sweet tooth.

Now, I’m trying to cut back in the sweets department simply because I tend to go a bit overboard with it. In my mind, a simple scoop of ice cream is a complete waste of my time. But, if you up it a scoop or two, drizzle that bad boy with some peanut butter sauce, and break up a couple Reese’s cups on top, now we’re talkin’. Unfortunately, I was speaking that language about every night for the past 3 months, and while it feels great going down, I wasn’t feeling so great in the mornings, all groggy and achy from what I’m sure was 3 days’ allotment of sugar being consumed in one sitting.

So I’m cutting back. But I still have a sweet tooth that needs assuaged. I know, I know. All you saintly eaters out there are saying, “Just grab a piece of fruit. That cures my sweet tooth every time.” Personally, I don’t think you have the slightest notion of what a sweet tooth actually is so I’m going to kindly ignore your comments and deal in the realm of reality. I need sweet, not fruit.

The one thing that’s been scratching my itch for the past couple of weeks is a bowl of homemade granola every night after dinner. I was getting to the place where I really loved it and my memories of those decadant ice cream sundaes started to fade. Then the money ran out. See, my homemade granola is chock full of all kinds of yummy nuts and dried berries, none of which are in my pantry at the moment, and all of which cost money, something I’m running low on. So I got creative and here’s the result: some stinkin’ good peanut butter granola that’s massaging the heck out of my sweet tooth and using up the contents of my pantry.

Sweet Tooth Peanut Butter Granola

4 ½ c. old-fashioned oats (I don’t think the results would be disastorous if you used quick oats but I like the chunky texture old-fashioned oats provide)
1 c. peanuts
1/3 c. peanut butter
1/3 c. honey
¼ c. peanut oil (I’m currently out of vegetable oil so it was a toss between peanut and olive—I went with the obvious choice and I wouldn’t change it for anything. I think it adds an added kick of peanutty flavor which I really like.)
Preheat oven to 275 degrees. (Now, I differ with a lot of homemade granola makers out there in the temperature I like to use. I keep the oven heat nice and low because I hate my granola to get even slightly burned. It does take a tad longer to get to that golden brown color, but I don’t mind pampering the old girl a bit to get what I want.)

In a big bowl, mix the oats and peanuts. In a separate small bowl, whisk together peanut butter, honey, and oil. Pour oil mixture over oat mixture and mix till coated. Spread on baking sheet and cook for 20 to 30 minutes, stirring occasionally. Cool granola by spreading on a sheet of foil, then store in a sealed container.

I’m not sure how my heart feels about adding some chocolate chips to this cooled granola, but my belly says, “Yes, please!” I’m gonna leave that call up to you. I’m afraid that if I start with the chocolate chips, before you know it, I’ll be adding M&M’s and broken up candy bars to it and still trying to pass it off as a healthy alternative to my monster sundaes. You’ve got to know where to draw the line for yourself. I trust you to make the right decision.

Before I sign off till next week, I just wanted to say a heartbreaking farewell to a dear friend who passed away on Wednesday after battling cancer for the past 5 years. Jen Hudson was a 36 year-old wife and mother to three beautiful children and an inspiration to so many who watched her fight this disease courageously, and she was also a food lover like all of us. So, Jen, here's to you. I know you are now enjoying a far better feast than any of us here on earth could imagine, and you finally have a body well enough to fully enjoy it. You will be greatly missed, my friend.

Have a great weekend, and enjoy this gift of life. I know I will.

Mai's Quiche: A Celebration of Friendship and a Moral Dilemma

About nine months ago, our family moved from Northern Virginia to my husband’s hometown of Lancaster, Pennsylvania. Perhaps, you’ve made a move before and can identify with the insecurities that often accompany the task of finding new friends after a move. Personally, I found my mentality mysteriously transformed to that of my fourth grade self in the late eighties when I attended a new school, wondering if my bangs were teased to the proper height or my jeans rolled tightly enough around my ankles. But instead of being a nine year old girl, I’m a thirty-one year old with four kids, still worrying if I’m cool enough for people to like me.

But then all those anxieties evaporate everytime I have the wonderful occasion to spend an afternoon with two of my best girlfriends from college who live about an hour away. We get together once a month, and my visits with them soothe my soul. So every time they come, I prepare something scrumptious for them to eat as a thanks for their beautiful friendship.

This recipe is from the brunch we had together a couple of weeks ago. I usually have qualms (I’d almost go so far as to say “a moral issue”) about putting chicken in a quiche. I’m not sure why, but I think any digging around there might uncover some mental tendencies in me that could put my new friendships in jeopardy so we’ll just move on.

Anyway, I found this quiche recipe that called for chicken, and it sounded so good that I decided to suspend my ethics and give it a try. What I present to you below is a recipe I concocted using hints from the original. It’s mind-boggling good and super easy, and-bonus-it doesn’t require a pastry crust like the traditional quiche! Beautiful!

Chicken and Ham Quiche

¾ c. chopped onions (My husband abhors onions so if you have a husband, or friends, with similar tastes, this is not the dish to serve to them, unless you are attempting to end the marriage/friendship.)
1 clove garlic, minced
1 tbsp. butter
6 eggs
¾ c. heavy whipping cream
½ lb. deli chicken, chopped (The original called for shredded, cooked chicken but I was short on time so I just made a quick stop to my friendly local deli counter and let them do the work.)
¼ lb. deli ham, chopped
2 c. cheddar cheese, shredded
1 tbsp. fresh flat leaf parsley, finely chopped
½ tsp. salt
Dash ground pepper

Preheat oven to 375 degrees. Grease 9-inch deep dish pie plate. Cook onions and garlic together in butter over medium heat until onions start to soften. In a large bowl, scramble eggs with heavy cream, then add in chicken, ham, cheese, onion mixture, parsley, salt, and pepper. Pour into pie plate and bake for 30 minutes, or until eggs are cooked.

We ate our quiche with a delicious fruit salad of fresh cherries, blueberries, blackberries, mangoes, and strawberries, and decided that fruit salad with melon in it is no longer chic. Perhaps you agree. Perhaps you are a die-hard melon lover and take great offense to the very thought of melon-less fruit salad. Please, enlighten me with your opinion. I’m interested in the melon/no-melon debate going on out there.

Wednesday, July 7, 2010

The Zucchini Challenge Winners- Part 2

The winner of the “savory” category of the Zucchini Challenge was up against some very tough competition. If you are looking for a good zucchini recipe, check out the comments from the intial Zucchini Challenge post because there are loads of great recipes there.

But I chose today’s winner because, frankly, the oppressive summer heat has put me in a semi-bad mood, and I’m kind of fed up with standing next to a scorching hot stove for hours on end trying to make use of this zucchini influx. So I present to you a beautiful, tasty, healthy and “minimal cooking required” recipe that almost makes the 100 degree temp outside bearable…

Zucchini Boats submitted by Kim and Caitlin!!!

A great big thank you to Kim, and her wonderful daughter Caitlin, for bringing this recipe into my world. It took me no more than 25 minutes to prep and cook this recipe. Granted, my zucchini aren’t as cute and petite as the traditional zucchini folks are finding at the markets and groceries these days. Most of my girls are a little thick around the middle and freakishly long, so they would make something more akin to zucchini cruise liners than zucchini boats, but thankfully my husband was able to scavenge a couple reasonably sized zucchini from the garden for this recipe.

Chances are your zucchini are still quite a bit smaller than what I had to work with, so I haven’t put any amounts next to the ingredients in this recipe. Just mix up however much of each item you think you need to fill the zucchini you’re working with.

Zucchini Boats

Kalamata olives
Chopped tomatoes
Crumbled feta cheese
1 clove of garlic, minced
Dash of salt
Fresh basil, chopped
Zucchini, halved lengthwise and center seeds scraped out
Olive oil

Preheat oven to 400 degrees. Simply mix together the first 6 ingredients in a bowl. Fill zucchini with mixture, place in a baking dish, drizzle with olive oil, and bake until zucchini begin to soften; mine took about 15 minutes.

My brother-in-law Ben had the brilliant idea of adding a dollop of hummus on top of his, which sounds amazing but I didn’t actually try it because I had already devoured my “boat” by the time he made the suggestion. But he seemed to be enjoying himself so I highly recommend you giving it a try.

I just want to again thank all of you for your suggestions and encouragement throughout The Zucchini Challenge, and a special thanks and congrats to Sara and Kim for their great recipes!!! Till tomorrow…

Sunday, June 27, 2010

Manic Monday takes a Serious Turn

First of all, I want to send out a big thank you to everyone who took the time to pass along your lunch ideas on Friday’s post. I can’t wait to put these to use this week. And for any of you who didn’t have a chance to join the discussion, go ahead and pop on over to Friday’s post for some great recipe ideas to take the monotony out of your lunch bag.

Alright, on to today’s post. But first, a warning. This post may be a bit of a “Debbie Downer”, but I figure Monday’s are always a little depressing so I’m not in danger of really spoiling anything, and I promise you that the recipe at the end of all this will redeem today’s subject matter.

Browsing through Borders last week, I happened upon a book titled Skinny Bitch. Okay, I know that on principle I should have never picked up a weight loss book written by models, who actually earn a paycheck by being thin (I’d love that kind of motivation), but we had an hour to kill before our movie started so I took the bait and started carelessly leafing through the pages.

The authors of the book are vegans and one way they attempt to recruit readers into their ranks is by discussing the subject of animal cruelty in slaughterhouses. If this topic is at all of interest to you, I suggest picking up their book and taking a look, but I caution you that I wouldn’t do it if you prefer to eat meat with a guilt-free conscience. What I briefly read in their book both shocked and disgusted me to the point that I’ve barely touched meat over the past week, and I’m contemplating how to cut more meat out of my family’s diet.

On that premise (and with all that nasty seriousness safely behind us), I present to you today’s Manic Monday recipe. And although it’s vegetarian, it's hearty and filling enough to satisfy the appetite of my dad, and believe me, that’s saying something; this is a man who has been known to polish off a 9x13 pan of enchiladas in one sitting.


In the above picture, the black bean cake is pictured with salsa and sour cream, but right now I’m envisioning them atop a Kaiser roll with all the traditional burger fixins. The variations are innumerable. Let your imagination run wild.

Black Bean Cakes

2, 15 oz. cans black beans, drained (or you could take the Laura Ingall’s route and soak a pound of dry black beans overnight and then cook them till their tender. But really, that’s uncalled for on a Monday.)
3 green onions, finely chopped
½ c. red bell pepper, seeded and finely chopped
¼ c. fresh cilantro, finely chopped
2 garlic cloves, minced
1 jalapeno chili, minced (This is totally optional. If heat isn’t your thing, just leave it out.)
2 tsp. ground cumin
1 tsp. salt
1 large egg, beaten
2 tablespoons plus ½ c. yellow cornmeal
Olive oil for frying

Put beans in a large mixing bowl and mash them up. Add green onions, pepper, cilantro, garlic, jalapeno, cumin, and salt. Mix in egg and 2 tbsp. corn meal.

Put ½ c. extra cornmeal in a small bowl. Divide black bean mixture evenly into 8 balls. Drop balls in extra cornmeal and coat. Flatten balls into disks. Heat ¼ inch of olive oil in large pan over medium heat. Fry cakes till firm and crisp, about 5 minutes per side. Drain on paper towels and serve however you desire.

Let me now put all your carnivorous fears to rest. I will still be passing along plenty of meaty recipes for those of you who go all sweaty and nervous at the mere mention of the word “vegetarian”. But I figure the occasional meatless meal can’t do any of us harm, and it buys Bessie an extra day on the farm so it’s a win/win for everyone!